全连接实现手写数字识别
数据集
介绍
MNIST( 下载地址), 手写数字识别数据集, 训练集60000个(其中55000条训练数据, 5000条验证数据), 测试集10000个.
原始数据文件:
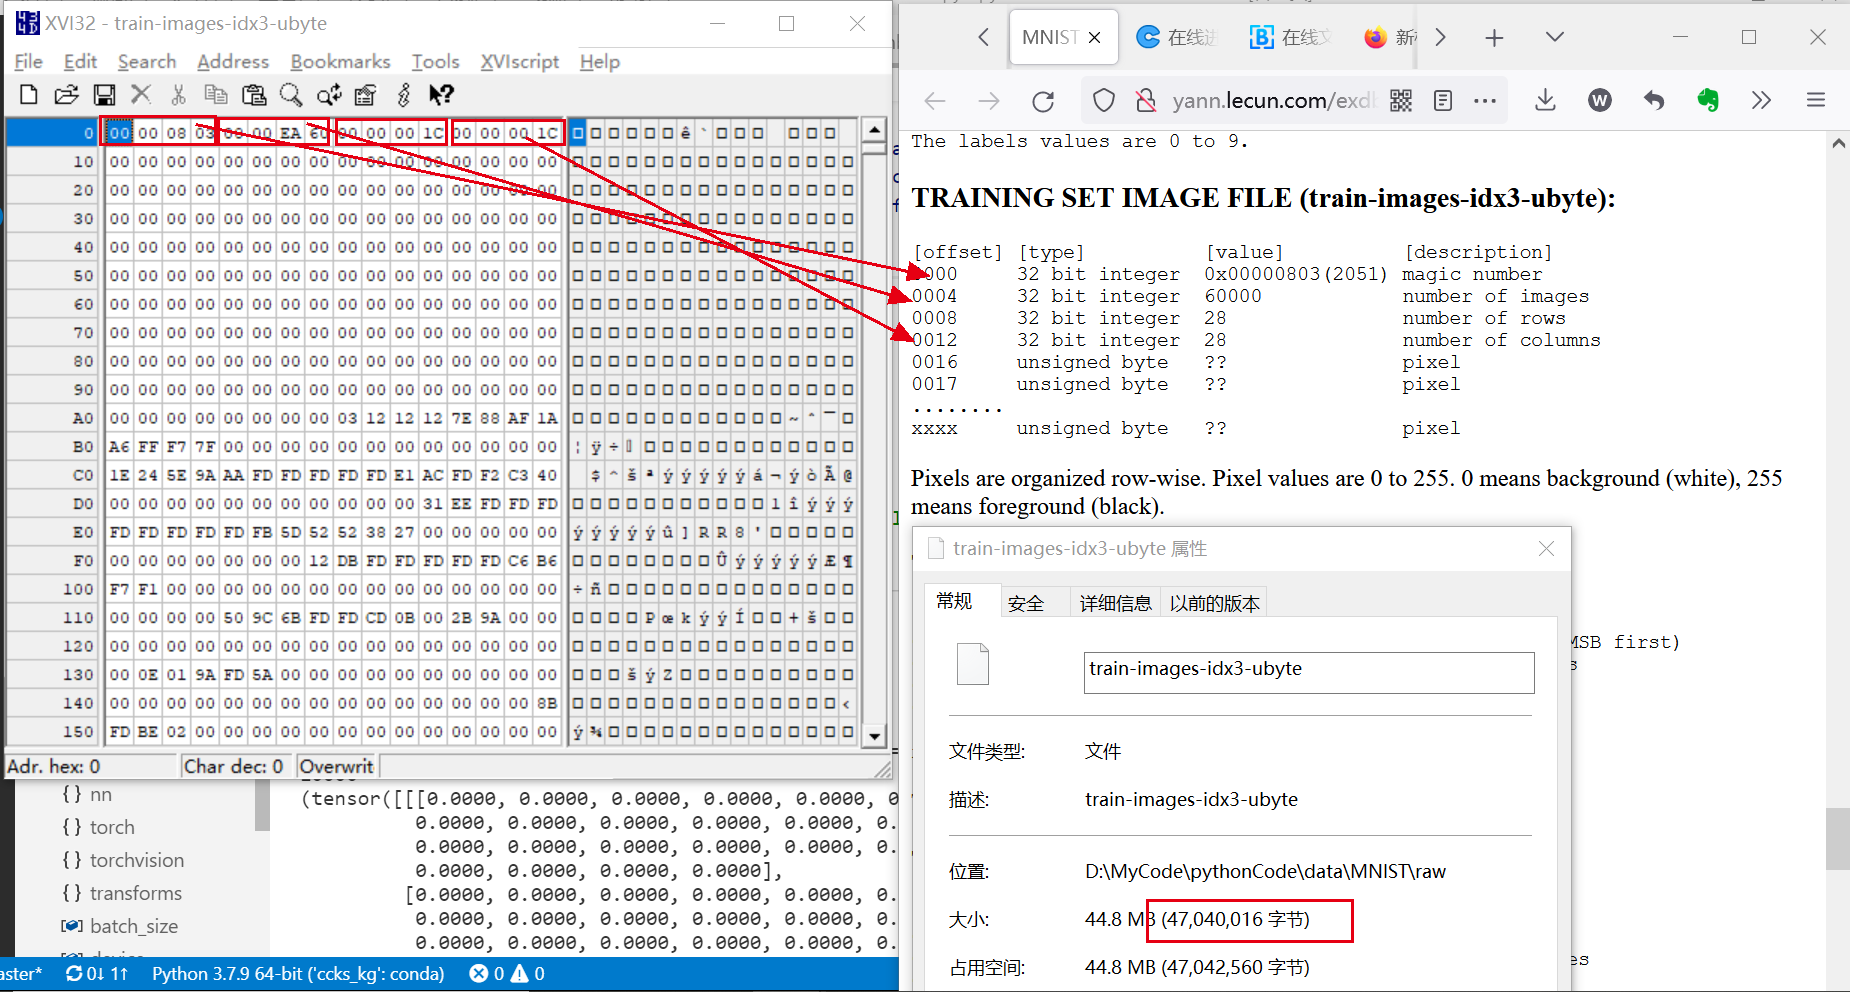
TRAINING SET IMAGE FILE (train-images-idx3-ubyte):
大小: $6000028281B+44B=47040016B$
内容:第一个4B为
magic number, 第二个4B为60000, 第3个4B为28, 第4个4B为28
像素是行组织的, 原始像素值为0到255, 0为白色, 255为黑色
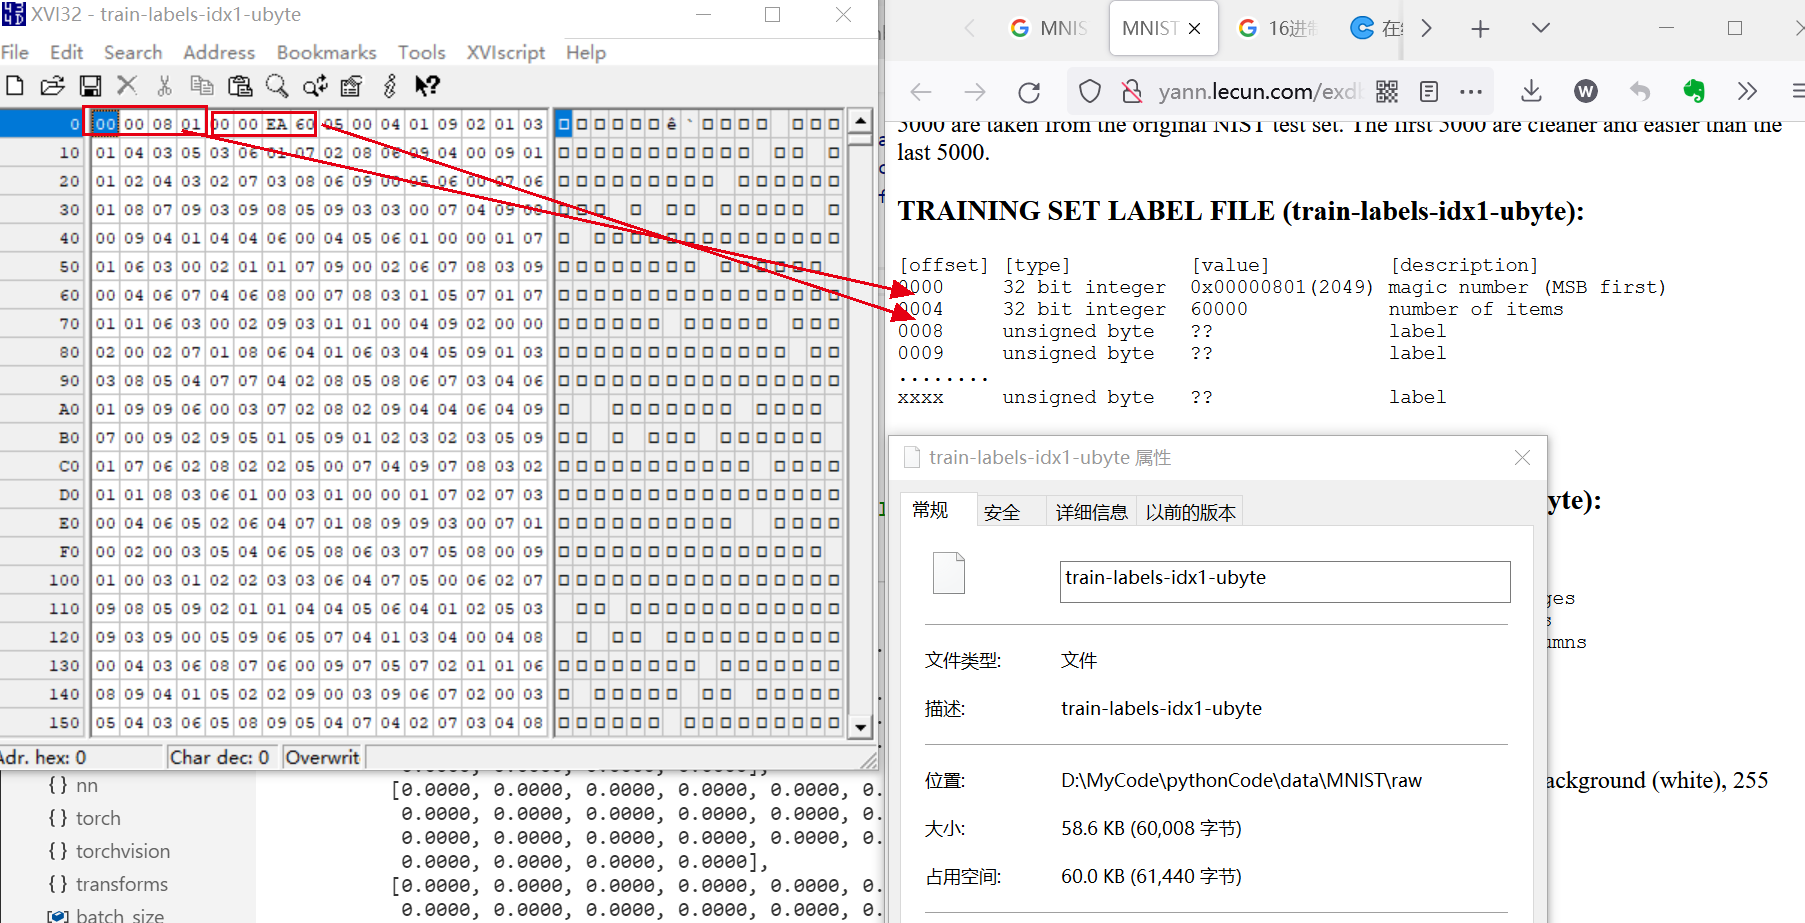
TRAINING SET LABEL FILE (train-labels-idx1-ubyte):
大小: 60008B(58.6KB), 计算公式为$60000*1B+4B+4B=60008B$
内容: 前4B是
magic number, 值为0x00000801表文件格式 再4B为item的数量, 值为60000表示60000个标签, 后面每个字节为无符号数, 表示对应图像的标签, 取值范围为0-9.
TEST SET LABEL FILE (t10k-labels-idx1-ubyte):测试集, 10000个
TEST SET LABEL FILE (t10k-labels-idx1-ubyte):测试集, 10000个
模型搭建
模型构建
使用全连接网络, 输入向量为784, 输出向量大小为10, 添加一层隐藏层就可以拟合”包含从一个有限空间到另一个有限空间的连续映射函数”, 所以本实验添加一层隐藏层. 虽然有一些计算隐藏层的数量的观点[^ 1 ],但是更广泛的是启发式的, 根据 Jeff Heaton的观点[^ 2 ], 有这样几条经验原则可供选定隐藏层神经单元的个数:
- 隐藏层单元个数应该再输入层和输出层个数之间.
- 隐藏层单元个数应该是输入层单元个数再加上输出层单元个数的2/3.
- 隐藏层单元个数应该比输入层单元个数的两倍要少.
同样, stackflow上的 criteria for choosing number of hidden layers and size of the hidden layer? [closed]也同样有用.
基于上面的经验, 我将隐藏层设置为$\lfloor \frac{2}{3} * (784+10)\rfloor = 529$.
输入层: 784
隐藏层: 529
输出层: 10
超参数选择
需要确定的超参数有:
hidden_size
num_epochs
batch_size
learning_rate
hidden_size
根据模型加载中的经验, 确定为$\lfloor \frac{2}{3} * (784+10)\rfloor = 529$.
num_epochs
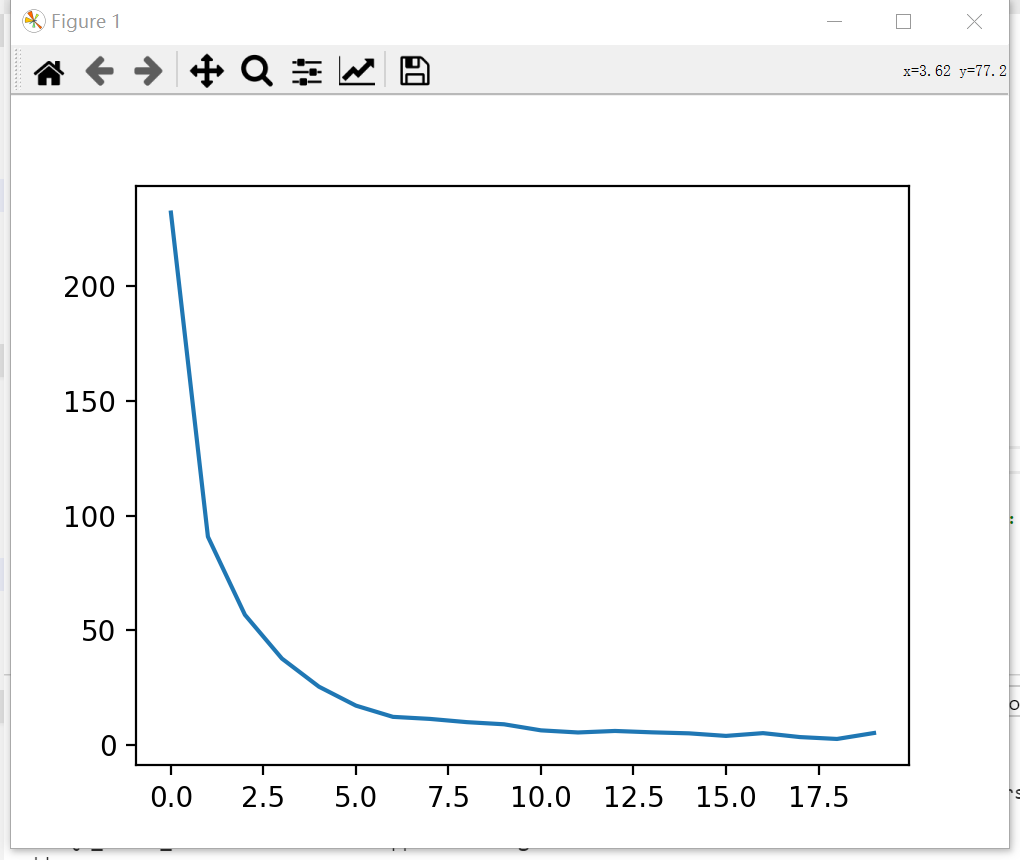
先定其他的参数为经验值, 再取num_epochs为一个较大的值,统计每个epoch的损失, 观察其变化不明细次数确定为使用的num_epochs, 如果$损失-epoch图像$在没有明显变缓, 则继续增大epoch, 否则选定变缓时的epoch.
| num_epochs | batch_size | learning_rate | 激活函数 | 验证集准确率 | 方法 |
|---|---|---|---|---|---|
| 20 | 64 | 0.001 | ReLU | 97.88% | 97.88% |

可以看到num_epoch在5-8之间loss趋于平缓, 所以将$num_epoch$选取6.
batch_size和learning_rate
| num_epochs | batch_size | learning_rate | 激活函数 | 验证集准确率 | 测试集准确率 |
|---|---|---|---|---|---|
| 6 | 32 | 0.01 | ReLU | 96.30% | 96.40% |
| 6 | 32 | 0.001 | ReLU | 97.66% | 97.86% |
| 6 | 32 | 0.0005 | ReLU | 97.88% | 97.75% |
| 6 | 64 | 0.01 | ReLU | 96.84% | 96.86% |
| 6 | 64 | 0.001 | ReLU | 97.28% | 97.28% |
| 6 | 64 | 0.0005 | ReLU | 97.60% | 97.89% |
在本次任务中, learning_rate取0.001可以兼顾速度和准确率, 而batch_size的变化对于准确率的影响不是很大.
数据加载
介绍
Pytorch提供torch.utils.data.Dataset和torch.utils.data.Dataloader进行数据的预处理, Dataset存储样本和对应的标签, DataLoader给Dataset包装一层迭代器便于访问数据.
加载Dataset
Pytorch在Torchvision模块中包含了一些常见的数据集
加载数据集代码如下, 需要提供四个参数:
rootis the path where the train/test data is stored,trainspecifies training or test dataset,download=Truedownloads the data from the internet if it’s not available atroot.transformandtarget_transformspecify the feature and label transformations
training_data = torchvision.datasets.MNIST(
    root="data",
    train=True,
    download=True,
    transform=transforms.ToTensor()
)
访问dataset
可以用[ ]来访问dataset, 比如MNIST数据集:
train_dataset = torchvision.datasets.MNIST(root='../../data',
                                           train=True,
                                           transform=transforms.ToTensor(),
                                           download=False)
print(train_dataset[1]) #tuple (1*28*28的Tensor, lable对应的num)
img, lable = train_dataset[0]
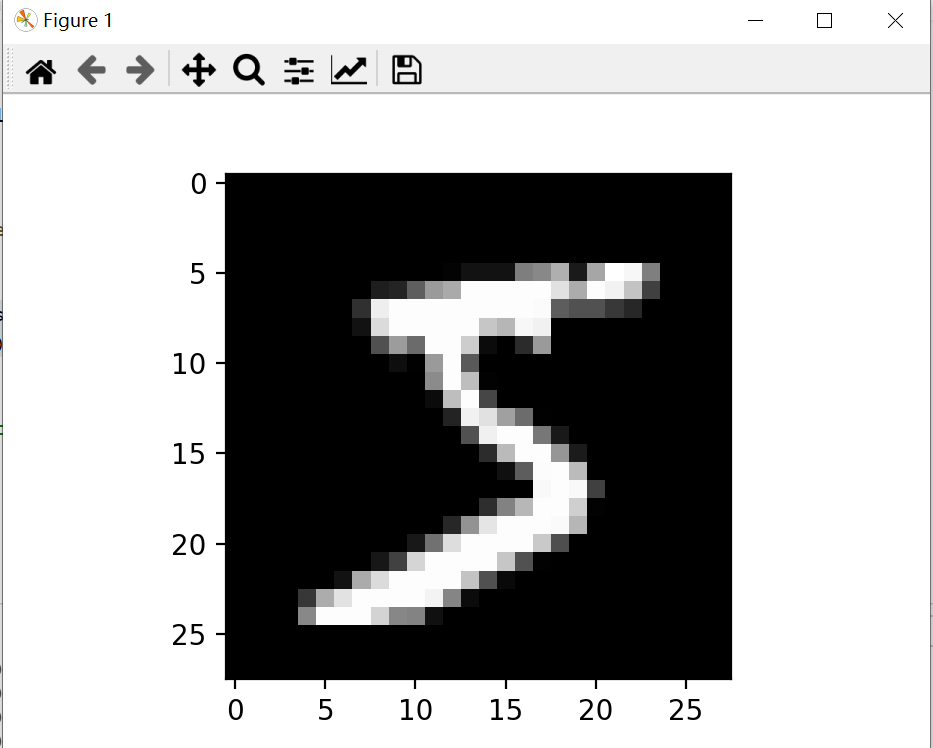
plt.imshow(img.squeeze(), cmap="gray")
plt.show()
可视化如图所示:

用Dataloaders准备训练数据
from torch.utils.data import DataLoader

train_dataloader = DataLoader(training_data, batch_size=64, shuffle=True)
test_dataloader = DataLoader(test_data, batch_size=64, shuffle=True)
Dataloader迭代访问数据
Dataloader的每个迭代会返回batch_size(默认为1)大小的数据, 比如
train_features, train_labels = next(iter(train_loader))
print(train_features.size())	#输出[64,1,28,28]
print(train_labels.size())		#输出[64]
损失函数
对于多分类问题, 我们采用交叉熵损失函数.
优化方法
采用Adam优化器.
结果评估
通过2层的神经网络, 可以达到97%左右的准确率.
[^ 1]: Zhang and A. J. Morris, “A Sequential Learning Approach for Single Hidden Layer Neural Networks,” Neural Networks, vol. 11, no. 1, pp. 65–80, Jan. 1998, doi: 10.1016/S0893-6080(97)00111-1. ↩
[^ 2]:
[^3]: https://www.heatonresearch.com/2017/06/01/hidden-layers.html.
CNN实现手写数字识别
数据集
介绍
MNIST( 下载地址), 手写数字识别数据集, 训练集60000个(其中55000条训练数据, 5000条验证数据), 测试集10000个.
原始数据文件:
TRAINING SET IMAGE FILE (train-images-idx3-ubyte):
大小: $6000028281B+44B=47040016B$
内容:第一个4B为
magic number, 第二个4B为60000, 第3个4B为28, 第4个4B为28
像素是行组织的, 原始像素值为0到255, 0为白色, 255为黑色
TRAINING SET LABEL FILE (train-labels-idx1-ubyte):
大小: 60008B(58.6KB), 计算公式为$60000*1B+4B+4B=60008B$
内容: 前4B是
magic number, 值为0x00000801表文件格式 再4B为item的数量, 值为60000表示60000个标签, 后面每个字节为无符号数, 表示对应图像的标签, 取值范围为0-9.
TEST SET LABEL FILE (t10k-labels-idx1-ubyte):测试集, 10000个
TEST SET LABEL FILE (t10k-labels-idx1-ubyte):测试集, 10000个
模型搭建
模型构建
输入层: $N128*28$
卷积层1: $N1628*28$(等宽卷积)
池化层1: $N1614*14$(最大池化, Stride=2, Kernel_size=2)
卷积层2: $N3214*14$(等宽卷积)
池化层2: $N327*7$(最大池化)
全连接层: $N*784$
输出层: $N*10$
注释:$N$为batch_size大小
超参数选择
需要确定的超参数有: num_epochs, batch_size, learning_rate, 根据经验, 设置为以下值
- num_epochs = 6
- batch_size = 64
- learning_rate = 0.001
数据加载
介绍
Pytorch提供torch.utils.data.Dataset和torch.utils.data.Dataloader进行数据的预处理, Dataset存储样本和对应的标签, DataLoader给Dataset包装一层迭代器便于访问数据.
加载Dataset
Pytorch在Torchvision模块中包含了一些常见的数据集
加载数据集代码如下, 需要提供四个参数:
rootis the path where the train/test data is stored,trainspecifies training or test dataset,download=Truedownloads the data from the internet if it’s not available atroot.transformandtarget_transformspecify the feature and label transformations
training_data = torchvision.datasets.MNIST(
    root="data",
    train=True,
    download=True,
    transform=transforms.ToTensor()
)
访问dataset
可以用[ ]来访问dataset, 比如MNIST数据集:
train_dataset = torchvision.datasets.MNIST(root='../../data',
                                           train=True,
                                           transform=transforms.ToTensor(),
                                           download=False)
print(train_dataset[1]) #tuple (1*28*28的Tensor, lable对应的num)
img, lable = train_dataset[0]
plt.imshow(img.squeeze(), cmap="gray")
plt.show()
可视化如图所示:

用Dataloaders准备训练数据
from torch.utils.data import DataLoader

train_dataloader = DataLoader(training_data, batch_size=64, shuffle=True)
test_dataloader = DataLoader(test_data, batch_size=64, shuffle=True)
Dataloader迭代访问数据
Dataloader的每个迭代会返回batch_size(默认为1)大小的数据, 比如
train_features, train_labels = next(iter(train_loader))
print(train_features.size())	#输出[64,1,28,28]
print(train_labels.size())		#输出[64]
损失函数
对于多分类问题, 我们采用交叉熵损失函数.
优化方法
采用Adam优化器.
结果评估
| num_epoch | batch_size | learning_rate | if_drop_out | 准确率 |
|---|---|---|---|---|
| 6 | 64 | 0.001 | 否 | 98.88% |
| 6 | 64 | 0.001 | 是 | 98.91% |
[^ 1]: Zhang and A. J. Morris, “A Sequential Learning Approach for Single Hidden Layer Neural Networks,” Neural Networks, vol. 11, no. 1, pp. 65–80, Jan. 1998, doi: 10.1016/S0893-6080(97)00111-1. ↩
[^ 2]:
[^3]: https://www.heatonresearch.com/2017/06/01/hidden-layers.html.
欢迎在评论区中进行批评指正,转载请注明来源,如涉及侵权,请联系作者删除。

