名字
简介
资料
安装配置
模块
BeautifulSoup
资料
安装配置
安装bs4
pip install beautifulsoup4
安装解析器
HTML解析器的工作是将HTML标识解析为解析树.
bs4支持Python标准库中的HTML解析器, 还支持第三方的解析器比如lxml, htm5lib, 推荐使用lxml作为解析器, 因为效率高, 而且还是唯一支持xml的解析器.
安装方法: pip install lxml
使用方法:
BeautifulSoup(markup, "lxml") 	# html解析
BeautifulSoup(markup, "xml")    # xml解析
不同的解析器在解析文档格式不正确的HTML或者XML时, 返回的结果不一样, 详情请看解析器之间的区别.
如何使用
将文档传入BeautifulSoup的构造方法中会得到一个BeautifulSoup对象, 也可以传入形如html文档的字符串或者文件.传入之后,文档会转为unicode编码然后自动选择解析器(也可以手动指定解析器)来解析文档为树结构, 解析为树结构之后就可以使用bs4的对象和其方法访问信息了.
以文件方式构造:
from bs4 import BeautifulSoup

soup = BeautifulSoup(open("index.html"))

soup = BeautifulSoup("<html>data</html>")
以网络请求方式构造:
from urllib.request import urlopen
from bs4 import BeautifulSoup

url = "http://yzw.sntcm.edu.cn/info/iList.jsp?cat_id=1608&cur_page=1"
html = urlopen(url).read()
soup = BeautifulSoup(html,'html.parser')
对象的种类
Beautiful Soup将复杂的HTML文档转换成一个复杂的HTML树形结构, 每个节点都Python对象, 所有对象都是以下4种:
- BeautifulSoup
- Tag: 标签节点
- NavagableString: 可遍历的字符串
- Comment: 注释
BeautifuleSoup
BeautifulSoup对象表示一个文档的全部内容, 可以把它当做Tag对象, 并且支持遍历文档树和搜索文档树中的方法, 它本应该没有Tag对象的.name和.attribute属性, 但是为了方便起见, 还是增加了`.name=’[document]``属性.
soup.name
# u'[document]'
Tag
Tag对象就是HTML中的标签, 支持 遍历文档树 和 搜索文档树的很多方法和属性, 它有两个基本的属性: name和attributes.
Tag对象的基本获取
soup = BeautifulSoup('<b class="boldest">Extremely bold</b>')
tag = soup.b
type(tag)
# <class 'bs4.element.Tag'>
Name
每个Tag对象的name就是标签的名称:
tag.name
# u'b'
可以直接修改
tag.name = "blockquote"
tag
# <blockquote class="boldest">Extremely bold</blockquote>
Attributes
attributes对象就是<b class="boldest">中的类似于class这种属性, 属性可以有很多个.
tag的属性操作方法和python字典相同:
tag['class']
# u'boldest'
可以直接**”点取”**Tag的所有属性:
tag.attrs
# {u'class': u'boldest'}
tag的属性可以被添加,删除或修改:
tag['class'] = 'verybold'
tag['id'] = 1
tag
# <blockquote class="verybold" id="1">Extremely bold</blockquote>

del tag['class']
del tag['id']
tag
# <blockquote>Extremely bold</blockquote>

tag['class']
# KeyError: 'class'
print(tag.get('class'))
# None
多值属性
class的值可能有多个, 类似的属性还有rel , rev , accept-charset , headers , accesskey . 在Beautiful Soup中多值属性的返回类型是list:
css_soup = BeautifulSoup('<p class="body strikeout"></p>')
css_soup.p['class']
# ["body", "strikeout"]

css_soup = BeautifulSoup('<p class="body"></p>')
css_soup.p['class']
# ["body"]
如果某个属性看起来有多个值, 但是在任何版本的HTML中都没有被定义为多值属性, 该属性的值会被解析为字符串而不是列表
id_soup = BeautifulSoup('<p id="my id"></p>')
id_soup.p['id']
# 'my id'
将tag转换成字符串时,多值属性会合并为一个值:
rel_soup = BeautifulSoup('<p>Back to the <a rel="index">homepage</a></p>')
rel_soup.a['rel']
# ['index']
rel_soup.a['rel'] = ['index', 'contents']
print(rel_soup.p)
# <p>Back to the <a rel="index contents">homepage</a></p>
如果转换的是XML文档, 则tag中不会包含多值属性(XML文档的要求), 所以只会被解析为字符串:
xml_soup = BeautifulSoup('<p class="body strikeout"></p>', 'xml')
xml_soup.p['class']
# u'body strikeout'
NavigableString
字符串常被包含在tag内.Beautiful Soup用 NavigableString 类来包装tag中的字符串:
tag.string
# u'Extremely bold'
type(tag.string)
# <class 'bs4.element.NavigableString'>
NavigableString字符串和Python中的Unicode字符串的内容是相同的(类不相同), 可以用Unicode(NavigableString)来转换为Unicode字符串, 另外NavigableString字符串的一些方法和使用会在 遍历文档树 和 搜索文档树 提到.
unicode_string = unicode(tag.string)
unicode_string
# u'Extremely bold'
type(unicode_string)
# <type 'unicode'>
Tag对象包含的字符串不能被编辑, 但是可以使用replace_with()方法替换:
tag.string.replace_with("No longer bold")
tag
# <blockquote>No longer bold</blockquote>
NavigableString字符串不能包含其它内容(tag能够包含字符串或是其它tag), 字符串不支持.contents, .string, find()方法.
如果想单独使用NavgableString对象的内容, 建议转换成普通的Unicode字符串, 否则BeautifulSoup对象结束后, 使用NavagleString对象的话还会引用结束的BeautifulSoup对象的地址, 会浪费内存.
Comment
文档的注释部分可以用comment对象访问, comment对象是一个特殊的NavigableString对象.它出现在HTML文档中, 会使用特殊的格式进行输出:
print(soup.b.prettify())
# <b>
#  <!--Hey, buddy. Want to buy a used parser?-->
# </b>
Beautiful Soup中定义的其它类型都可能会出现在XML的文档中: CData , ProcessingInstruction , Declaration , Doctype .与 Comment 对象类似,这些类都是 NavigableString 的子类,只是添加了一些额外的方法的字符串独享.下面是用CDATA来替代注释的例子:
from bs4 import CData
cdata = CData("A CDATA block")
comment.replace_with(cdata)

print(soup.b.prettify())
# <b>
#  <![CDATA[A CDATA block]]>
遍历文档树
还拿”爱丽丝梦游仙境”的文档来做例子:
html_doc = """
<html><head><title>The Dormouse's story</title></head>
    <body>
<p class="title"><b>The Dormouse's story</b></p>

<p class="story">Once upon a time there were three little sisters; and their names were
<a href="http://example.com/elsie" class="sister" id="link1">Elsie</a>,
<a href="http://example.com/lacie" class="sister" id="link2">Lacie</a> and
<a href="http://example.com/tillie" class="sister" id="link3">Tillie</a>;
and they lived at the bottom of a well.</p>

<p class="story">...</p>
"""

from bs4 import BeautifulSoup
soup = BeautifulSoup(html_doc, 'html.parser')
通过这段例子来演示怎样从文档的一段内容找到另一段内容
子节点
Tag节点包含的子节点可能包含多个字符串或者其他tag, bs4提供了一些操作或者属性来遍历这些内容, 而NavigableString对象不支持这些属性, 因为字符串对象没有子节点.
使用子节点名字来访问
想访问标签子节点的话, 可以使用soup.head(因为可以把BeautifuleSoup对象看做Tag对象):
soup.head
# <head><title>The Dormouse's story</title></head>

soup.title
# <title>The Dormouse's story</title>
可以”链接”使用该方法, 比如获取标签中的第一个标签:
soup.body.b
通过”点取”的方式只能获取第一个子节点, 如果子节点有多个同名Tag对象的话, 可以使用find_all()方法:
soup.find_all('a')
# [<a class="sister" href="http://example.com/elsie" id="link1">Elsie</a>,
#  <a class="sister" href="http://example.com/lacie" id="link2">Lacie</a>,
#  <a class="sister" href="http://example.com/tillie" id="link3">Tillie</a>]
.contents和.children
Tag对象的.contents属性可以将Tag的直接子节点以列表的方式输出:
head_tag = soup.head
head_tag
# <head><title>The Dormouse's story</title></head>

head_tag.contents
[<title>The Dormouse's story</title>]

title_tag = head_tag.contents[0]
title_tag
# <title>The Dormouse's story</title>
title_tag.contents
# [u'The Dormouse's story']
BeautifulSoup对象一定会包含子节点, 也就是说标签一定是BeautifulSoup对象的第一个也是唯一一个子节点(因为html文档都包含在标签内):
len(soup.contents)
# 1
soup.contents[0].name
# u'html'
通过tag的 .children 生成器,可以对tag的直接子节点进行循环:
for child in title_tag.children:
    print(child)
    # The Dormouse's story
可以通过list()方法将.children转化为list, 但是直接访问.contents不香嘛
.descendants
.contents和children都仅包含Tag对象的**直接子节点`:
head_tag.contents
# [<title>The Dormouse's story</title>]
而The Dormouse's story也是title对象的子节点, 而是head对象的子孙节点 , 这时候可以用.descendants对Tag对象的所有子孙节点进行树遍历循环( 采用先序遍历方式):
for child in head_tag.descendants:
    print(child)
    # <title>The Dormouse's story</title>
    # The Dormouse's story
BeautifulSoup 有一个直接子节点(节点),却有很多子孙节点:
len(list(soup.children))
# 1
len(list(soup.descendants))
# 25
.string
如果Tag只有一个NavigableString类型子节点, 那么可以用.string可以得到这个字符串子节点:
title_tag.string
# u'The Dormouse's story'
如果Tag只有一个子节点, 那么也可以用.string输出与与当前唯一子节点的 .string 结果相同的字符串:
head_tag.contents
# [<title>The Dormouse's story</title>]

head_tag.string
# u'The Dormouse's story'
如果Tag包含多个子节点, 使用.string会返回None, 因为不能确定是哪个子节点的字符串
.strings和stripped_strings
Tag对象下面的所有子孙节点的字符串可以用.strings来循环(前序递归遍历)获取:
for string in soup.strings:
    print(repr(string))
    # u"The Dormouse's story"
    # u'\n\n'
    # u"The Dormouse's story"
    # u'\n\n'
    # u'Once upon a time there were three little sisters; and their names were\n'
    # u'Elsie'
    # u',\n'
    # u'Lacie'
    # ....
输出的字符串中可能包含了很多空格或空行,使用 .stripped_strings 可以去除多余空白内容(删除空行或者段首段末的空白):
for string in soup.stripped_strings:
    print(repr(string))
    # u"The Dormouse's story"
    # u"The Dormouse's story"
    # u'Once upon a time there were three little sisters; and their names were'
    # u'Elsie'
父节点
继续分析文档树,每个tag或字符串都有父节点:被包含在某个tag中
.parent
通过.parent可以获取某个元素的父节点.
<head>是<title>的父节点.
<html>的父节点是BeautifulSoup对象.
BeautifulSoup 对象的 .parent 是None.
.parents
通过元素的 .parents 属性可以递归得到元素的所有父辈节点,下面的例子使用了 .parents 方法遍历了标签到根节点的所有节点.
link = soup.a
link
# <a class="sister" href="http://example.com/elsie" id="link1">Elsie</a>
for parent in link.parents:
    if parent is None:
        print(parent)
    else:
        print(parent.name)
# p
# body
# html
# [document]
# None
兄弟节点
看一段简单的例子:
sibling_soup = BeautifulSoup("<a><b>text1</b><c>text2</c></b></a>")
print(sibling_soup.prettify())
# <html>
#  <body>
#   <a>
#    <b>
#     text1
#    </b>
#    <c>
#     text2
#    </c>
#   </a>
#  </body>
# </html>
因为标签和
.next_sibling和.previous_sibling
在文档树中,使用 .next_sibling 和 .previous_sibling 属性来查询兄弟节点:
sibling_soup.b.next_sibling
# <c>text2</c>

sibling_soup.c.previous_sibling
# <b>text1</b>
如果是第一个节点的话则其previous_sibling为none, 而最后一个节点的next_sibling为none.
在实际文档中,.next_sibling 和 .previous_sibling 属性通常是字符串或空白. 看看“爱丽丝”文档:
<a href="http://example.com/elsie" class="sister" id="link1">Elsie</a>
<a href="http://example.com/lacie" class="sister" id="link2">Lacie</a>
<a href="http://example.com/tillie" class="sister" id="link3">Tillie</a>
如果以为第一个标签的 .next_sibling 结果是第二个标签,那就错了,真实结果是第一个标签和第二个标签之间的顿号和换行符:
link = soup.a
link
# <a class="sister" href="http://example.com/elsie" id="link1">Elsie</a>

link.next_sibling
# u',\n'
link.next_sibling.next_sibling
# <a class="sister" href="http://example.com/lacie" id="link2">Lacie</a>
.next_siblings和.previous_siblings
通过 .next_siblings 和 .previous_siblings 属性可以对当前节点的兄弟节点迭代输出:
for sibling in soup.a.next_siblings:
    print(repr(sibling))
    # u',\n'
    # <a class="sister" href="http://example.com/lacie" id="link2">Lacie</a>
    # u' and\n'
    # <a class="sister" href="http://example.com/tillie" id="link3">Tillie</a>
    # u'; and they lived at the bottom of a well.'
    # None

for sibling in soup.find(id="link3").previous_siblings:
    print(repr(sibling))
    # ' and\n'
    # <a class="sister" href="http://example.com/lacie" id="link2">Lacie</a>
    # u',\n'
    # <a class="sister" href="http://example.com/elsie" id="link1">Elsie</a>
    # u'Once upon a time there were three little sisters; and their names were\n'
    # None
回退和前进
<html><head><title>The Dormouse's story</title></head>
<p class="title"><b>The Dormouse's story</b></p>
HTML解析器把这段字符串转换成一连串的事件:
.next_element 和 .previous_element
.next_element 属性指向解析过程中下一个被解析的对象(字符串或tag),结果可能与 .next_sibling 相同,但通常是不一样的.
.next_sibling和.next_element的区别:
<a href="http://example.com/elsie" class="sister" id="link1">Elsie</a>,
<a href="http://example.com/lacie" class="sister" id="link2">Lacie</a> and
<a href="http://example.com/tillie" class="sister" id="link3">Tillie</a>;
last_a_tag = soup.find("a", id="link3")
last_a_tag的.next_sibling是\n, 而.next_element是字符串Tillie.
.next_elements 和 .previous_elements
通过 .next_elements 和 .previous_elements 的迭代器就可以向前或向后访问文档的解析内容,就好像文档正在被解析一样:
for element in last_a_tag.next_elements:
    print(repr(element))
# u'Tillie'
# u';\nand they lived at the bottom of a well.'
# u'\n\n'
# <p class="story">...</p>
# u'...'
# u'\n'
# None
搜索文档树
常见的搜索方法有find()和find_all()
过滤器
过滤器可以被用在Tag的name中, 节点的属性中, 字符串中或他们的混合中.接下来介绍过滤器的类型
字符串
最简单的过滤器是字符串, 也就是匹配和该字符串完整匹配的内容, 比如
soup.find_all('b')
# [<b>The Dormouse's story</b>]
如果传入字节码参数,Beautiful Soup会当作UTF-8编码,可以传入一段Unicode 编码来避免Beautiful Soup解析编码出错.
正则表达式
传入正则表达式的话, 会以正则表达式match()来匹配内容, 下面的例子找出所有以b开头的标签:
import re
for tag in soup.find_all(re.compile("^b"))
列表
如果传入过滤器是的是列表类型, 则会返回与列表中任一元素匹配的内容返回.
找出所有的<a>与<b>标签
soup.find_all(["a", "b"])
# [<b>The Dormouse's story</b>,
#  <a class="sister" href="http://example.com/elsie" id="link1">Elsie</a>,
#  <a class="sister" href="http://example.com/lacie" id="link2">Lacie</a>,
#  <a class="sister" href="http://example.com/tillie" id="link3">Tillie</a>]
True
True可以匹配任何内容.
查找Tag的所有子Tag(不会返回字符串节点):
for tag in soup.find_all(True):
    print(tag.name)
# html
# head
# title
# body
# p
# b
# p
# a
# a
# a
# p
方法
可以自定义一个返回真假的方法, 该方法只接收一个参数(为元素, 不能是文本), 符合条件则为真, 否则返回假.
下面方法校验了当前元素,如果包含 class 属性却不包含 id 属性,那么将返回 True:
def has_class_but_no_id(tag):
    return tag.has_attr('class') and not tag.has_attr('id')
将这个方法作为参数传入 find_all() 方法,将得到所有
标签:
soup.find_all(has_class_but_no_id)
# [<p class="title"><b>The Dormouse's story</b></p>,
#  <p class="story">Once upon a time there were...</p>,
#  <p class="story">...</p>]
返回结果中只有
标签没有标签,因为标签还定义了”id”,没有返回和,因为和中没有定义”class”属性.
通过一个方法来过滤一类标签属性的时候, 这个方法的参数是要被过滤的属性的值, 而不是这个标签. 下面的例子是找出 href 属性不符合指定正则的 a 标签.
def not_lacie(href):
        return href and not re.compile("lacie").search(href)
soup.find_all(href=not_lacie)
# [<a class="sister" href="http://example.com/elsie" id="link1">Elsie</a>,
#  <a class="sister" href="http://example.com/tillie" id="link3">Tillie</a>]
标签过滤方法可以使用复杂方法. 下面的例子可以过滤出前后都有文字的标签.
from bs4 import NavigableString
def surrounded_by_strings(tag):
    return (isinstance(tag.next_element, NavigableString)
            and isinstance(tag.previous_element, NavigableString))

for tag in soup.find_all(surrounded_by_strings):
    print tag.name
# p
# a
# a
# a
# p
find_all()
find_all( name , attrs , recursive , string , **kwargs )
find_all() 方法搜索当前tag的所有tag子节点,并判断是否符合过滤器的条件.这里有几个例子:
soup.find_all("a")
# [<a class="sister" href="http://example.com/elsie" id="link1">Elsie</a>,
#  <a class="sister" href="http://example.com/lacie" id="link2">Lacie</a>,
#  <a class="sister" href="http://example.com/tillie" id="link3">Tillie</a>]

soup.find_all("p", "title")
# [<p class="title"><b>The Dormouse's story</b></p>]

soup.find_all(id="link2")
# [<a class="sister" href="http://example.com/lacie" id="link2">Lacie</a>]

soup.find_all(class_="sister")			# 注意class_后面又下划线, 因为原来class是保留字
# [<a class="sister" href="http://example.com/elsie" id="link1">Elsie</a>,
#  <a class="sister" href="http://example.com/lacie" id="link2">Lacie</a>,
#  <a class="sister" href="http://example.com/tillie" id="link3">Tillie</a>]
name参数
name 参数可以查找所有名字为 name 的tag,字符串对象会被自动忽略掉.
简单的用法如下:
soup.find_all("title")
# [<title>The Dormouse's story</title>]
重申: 搜索 name 参数的值可以使任一类型的 过滤器 ,字符窜,正则表达式,列表,方法或是 True .
keyword属性
如果一个指定名字的参数不是搜索内置的参数名(name, attrs, recursive, string), 则bs4会把该参数当作指定名字Tag对象的属性来搜索, 例如:
soup.find_all(id='link2')
# [<a class="sister" href="http://example.com/lacie" id="link2">Lacie</a>]
如果传入 href 参数,Beautiful Soup会搜索每个tag的”href”属性:
soup.find_all(href=re.compile("elsie"))
# [<a class="sister" href="http://example.com/elsie" id="link1">Elsie</a>]
搜索指定名字的属性时可以使用的参数值包括 字符串 , 正则表达式 , 列表, True .
下面的例子在文档树中查找所有包含 id 属性的tag,无论 id 的值是什么:
soup.find_all(id=True)
# [<a class="sister" href="http://example.com/elsie" id="link1">Elsie</a>,
#  <a class="sister" href="http://example.com/lacie" id="link2">Lacie</a>,
#  <a class="sister" href="http://example.com/tillie" id="link3">Tillie</a>]
使用多个指定名字的参数可以同时过滤tag的多个属性:
soup.find_all(href=re.compile("elsie"), id='link1')
# [<a class="sister" href="http://example.com/elsie" id="link1">three</a>]
有些tag属性在搜索不能使用,比如HTML5中的 data-* 属性:
data_soup = BeautifulSoup('<div data-foo="value">foo!</div>')
data_soup.find_all(data-foo="value")
# SyntaxError: keyword can't be an expression
但是可以通过 find_all() 方法的 attrs 参数定义一个字典参数来搜索包含特殊属性的tag:
data_soup.find_all(attrs={"data-foo": "value"})
# [<div data-foo="value">foo!</div>]
按照CSS搜索
可以通过指定keyword为class_来搜索对应class的Tag, 因为class在python中是关键字, 所以加了下划线.
class_也可以接收不同类型的过滤器.
soup.find_all(class_=re.compile("itl"))
# [<p class="title"><b>The Dormouse's story</b></p>]

def has_six_characters(css_class):
    return css_class is not None and len(css_class) == 6

soup.find_all(class_=has_six_characters)
# [<a class="sister" href="http://example.com/elsie" id="link1">Elsie</a>,
#  <a class="sister" href="http://example.com/lacie" id="link2">Lacie</a>,
#  <a class="sister" href="http://example.com/tillie" id="link3">Tillie</a>]
string参数
通过 string 参数可以搜搜文档中的字符串内容, 与name参数的可选值一样, string参数可以接字符串, 正则表达式, 列表, True:
soup.find_all(string="Elsie")
# [u'Elsie']

soup.find_all(string=["Tillie", "Elsie", "Lacie"])
# [u'Elsie', u'Lacie', u'Tillie']

soup.find_all(string=re.compile("Dormouse"))
[u"The Dormouse's story", u"The Dormouse's story"]

def is_the_only_string_within_a_tag(s):
    ""Return True if this string is the only child of its parent tag.""
    return (s == s.parent.string)

soup.find_all(string=is_the_only_string_within_a_tag)
# [u"The Dormouse's story", u"The Dormouse's story", u'Elsie', u'Lacie', u'Tillie', u'...']
limit参数
如果搜索导得结果很大的话, 可以使用limte参数限制返回的数量, 类似于数据库中的limit, 达到搜索限制时, 停止搜索返回结果.
soup.find_all("a", limit=2)
# [<a class="sister" href="http://example.com/elsie" id="link1">Elsie</a>,
#  <a class="sister" href="http://example.com/lacie" id="link2">Lacie</a>]
recursive参数
recursive=true时 只搜寻子节点, 不搜寻子孙节点, 之对于find()和find_all()参数有效.
find_all()的简化语法
BeautifulSoup对象和Tag对象可以被当作方法执行, 结果与在对象上调用.find_all()方法一样.
下面两行代码等价:
soup.find_all("a")	#soup("a")
soup.title.find_all(string=True)	#soup.title(string=True)
find()
find( name , attrs , recursive , string , **kwargs )
如果只需要一个结果(唯一一个或者时第一个节点), 则直接用find()返回Tag对象, 而如果用find_all()的话就算返回一个, 也还是列表.
其他查询方法(十个)
除了find()和find_all()方法, 还有十个搜索方法, 他们的参数与之相同, 区别时他们搜索文档的不同部分.
find_parents()
返回符合条件的所有父辈节点find_parent()
返回符合条件的所有父辈节点中的第一个节点find_next_siblings()
返回所有符合条件的后面的兄弟节点find_next_sibling()
返回所有符合条件的后面的兄弟节点中的第一个节点find_previous_sibings()
返回所有符合条件的前面的兄弟节点find_previous_sibings()
返回所有符合条件的前面的兄弟节点的第一个节点find_all_next()
这2个方法通过 .next_elements 属性对当前tag的之后的 [5] tag和字符串进行迭代,find_all_next()方法返回所有符合条件的节点find_next()
前者的结果中的第一个find_all_previous()
这2个方法通过 .previous_elements 属性对当前节点前面 [5] 的tag和字符串进行迭代,
find_all_previous()方法返回所有符合条件的节点find_previous()
前者的结果中的第一个
.select()方法(CSS选择器)
Beautiful Soup支持大部分的CSS选择器 http://www.w3.org/TR/CSS2/selector.html , 在 Tag 或 BeautifulSoup 对象的 .select() 方法中传入字符串参数, 即可使用CSS选择器的语法找到tag:
soup.select("title")
# [<title>The Dormouse's story</title>]

soup.select("p nth-of-type(3)")
# [<p class="story">...</p>]
通过tag标签逐层查找:
soup.select("body a")
# [<a class="sister" href="http://example.com/elsie" id="link1">Elsie</a>,
#  <a class="sister" href="http://example.com/lacie"  id="link2">Lacie</a>,
#  <a class="sister" href="http://example.com/tillie" id="link3">Tillie</a>]

soup.select("html head title")
# [<title>The Dormouse's story</title>]
找到某个tag标签下的直接子标签 [6] :
soup.select("head > title")
# [<title>The Dormouse's story</title>]
修改文档树
修改Tag的名字和属性
soup = BeautifulSoup('<b class="boldest">Extremely bold</b>')
tag = soup.b

# 修改
tag.name="blockquote"
tag['class']='verybold'

# 删除
del tag['class']
修改.string
tag.string="text"
如果tag包含其他的tag, 也会直接覆盖掉.
append()
先构造BeautfuleSoup对象, 再用append()方法加入.
soup = BeautifulSoup("<a>Foo</a>")
soup.a.append("Bar")
NavigableString() 和 .new_tag()
想添加文本内容到文档中, 可以调用Python的append("string")方法或者先构造NavigableString对象再用append()方法添加对象到节点中去.
soup = BeautifulSoup("<b></b>")
tag = soup.b
tag.append("Hello")
new_string = NavigableString(" there")
tag.append(new_string)
如果想要创建一段注释,或 NavigableString 的任何子类, 只要调用 NavigableString 的构造方法:
from bs4 import Comment
new_comment = soup.new_string("Nice to see you.", Comment)
tag.append(new_comment)
创建一个tag最好的方法是调用工厂方法 BeautifulSoup.new_tag() :
soup = BeautifulSoup("<b></b>")
original_tag = soup.b

new_tag = soup.new_tag("a", href="http://www.example.com")
original_tag.append(new_tag)
original_tag
# <b><a href="http://www.example.com"></a></b>

new_tag.string = "Link text."
original_tag
# <b><a href="http://www.example.com">Link text.</a></b>
insert()
Tag.insert() 方法与 Tag.append() 方法类似,区别是不会把新元素添加到父节点 .contents 属性的最后,而是把元素插入到指定的位置.与Python列表总的 .insert() 方法的用法下同:
markup = '<a href="http://example.com/">I linked to <i>example.com</i></a>'
soup = BeautifulSoup(markup)
tag = soup.a

tag.insert(1, "but did not endorse ")
insert_before()和insert_after()
insert_before() 方法在当前tag或文本节点前插入内容:
soup = BeautifulSoup("<b>stop</b>")
tag = soup.new_tag("i")
tag.string = "Don't"
soup.b.string.insert_before(tag)
soup.b
# <b><i>Don't</i>stop</b>
insert_after() 方法在当前tag或文本节点后插入内容.
clear()
Tag.clear() 方法移除当前tag的内容(除了本节点):
markup = '<a href="http://example.com/">I linked to <i>example.com</i></a>'
soup = BeautifulSoup(markup)
tag = soup.a

tag.clear()
tag
# <a href="http://example.com/"></a>
extract()
PageElement.extract() 方法将当前tag移除文档树,并作为方法结果返回:
markup = '<a href="http://example.com/">I linked to <i>example.com</i></a>'
soup = BeautifulSoup(markup)
a_tag = soup.a

i_tag = soup.i.extract()

a_tag
# <a href="http://example.com/">I linked to</a>

i_tag
# <i>example.com</i>

print(i_tag.parent)
None
这个方法实际上产生了2个文档树: 一个是用来解析原始文档的 BeautifulSoup 对象,另一个是被移除并且返回的tag.被移除并返回的tag可以继续调用 extract 方.
decompose()
PageElement.decompose()删除该节点.
replace_with()
PageElement.replace_with() 方法移除文档树中的某段内容,并用新tag或文本节点替代它.
wrap()
PageElement.wrap() 方法可以对指定的tag元素进行包装 [8] ,并返回包装后的结果:
soup = BeautifulSoup("<p>I wish I was bold.</p>")
soup.p.string.wrap(soup.new_tag("b"))
# <b>I wish I was bold.</b>

soup.p.wrap(soup.new_tag("div"))
# <div><p><b>I wish I was bold.</b></p></div>
unwrap()
Tag.unwrap() 方法与 wrap() 方法相反.将移除tag内的所有tag标签,该方法常被用来进行标记的解包:
markup = '<a href="http://example.com/">I linked to <i>example.com</i></a>'
soup = BeautifulSoup(markup)
a_tag = soup.a

a_tag.i.unwrap()
a_tag
# <a href="http://example.com/">I linked to example.com</a>
输出
格式化输出
prettify()方法将BeautifuleSoup的文档树格式化后以Unicode编码输出, 每个标签都独占一行.
markup = '<a href="http://example.com/">I linked to <i>example.com</i></a>'
soup = BeautifulSoup(markup)
soup.prettify()
# '<html>\n <head>\n </head>\n <body>\n  <a href="http://example.com/">\n...'

print(soup.prettify())
# <html>
#  <head>
#  </head>
#  <body>
#   <a href="http://example.com/">
#    I linked to
#    <i>
#     example.com
#    </i>
#   </a>
#  </body>
# </html>
压缩输出
如果只想得到结果字符串,不重视格式,那么可以对一个 BeautifulSoup 对象或 Tag 对象使用Python的 unicode() 或 str() 方法:
str(soup)
# '<html><head></head><body><a href="http://example.com/">I linked to <i>example.com</i></a></body></html>'

unicode(soup.a)
# u'<a href="http://example.com/">I linked to <i>example.com</i></a>'
str() 方法返回UTF-8编码的字符串,可以指定 编码 的设置.
输出格式
BeautifulSoup输出会将所有的特殊字符替换成Unicode.
soup = BeautifulSoup("“Dammit!” he said.")
unicode(soup)
# u'<html><head></head><body>\u201cDammit!\u201d he said.</body></html>'
如果将文档转换成字符串,Unicode编码会被编码成UTF-8.这样就无法正确显示HTML特殊字符了:
str(soup)
# '<html><head></head><body>\xe2\x80\x9cDammit!\xe2\x80\x9d he said.</body></html>'
get_text()
如果只想得到tag中包含的文本内容,那么可以用 get_text() 方法,这个方法获取到tag中包含的所有文版内容包括子孙tag中的内容,并将结果作为Unicode字符串返回:
markup = '<a href="http://example.com/">\nI linked to <i>example.com</i>\n</a>'
soup = BeautifulSoup(markup)

soup.get_text()
u'\nI linked to example.com\n'
soup.i.get_text()
u'example.com'
可以通过参数指定tag的文本内容的分隔符:
# soup.get_text("|")
u'\nI linked to |example.com|\n'
还可以去除获得文本内容的前后空白:
# soup.get_text("|", strip=True)
u'I linked to|example.com'
比较对象是否相同
两个 NavigableString 或 Tag 对象具有相同的HTML或XML结构时, Beautiful Soup就判断这两个对象相同. 这个例子中, 2个 标签在 BS 中是相同的, 尽管他们在文档树的不同位置, 但是具有相同的表象: “pizza”
markup = "<p>I want <b>pizza</b> and more <b>pizza</b>!</p>"
soup = BeautifulSoup(markup, 'html.parser')
first_b, second_b = soup.find_all('b')
print first_b == second_b
# True

print first_b.previous_element == second_b.previous_element
# False
如果想判断两个对象是否严格的指向同一个对象可以通过 is 来判断
print first_b is second_b
# False
复制Beautiful Soup对象
copy.copy() 方法可以复制任意 Tag 或 NavigableString 对象
import copy
p_copy = copy.copy(soup.p)
print p_copy
# <p>I want <b>pizza</b> and more <b>pizza</b>!</p>
复制后的对象跟与对象是相等的, 但指向不同的内存地址
print soup.p == p_copy
# True

print soup.p is p_copy
# False
源对象和复制对象的区别是源对象在文档树中, 而复制后的对象是独立的还没有添加到文档树中. 复制后对象的效果跟调用了 extract() 方法相同.
print p_copy.parent
# None
这是因为相等的对象不能同时插入相同的位置
解析部分文档
如果仅仅因为想要查找文档中的标签而将整片文档进行解析,实在是浪费内存和时间.最快的方法是从一开始就把标签以外的东西都忽略掉. SoupStrainer 类可以定义文档的某段内容,这样搜索文档时就不必先解析整篇文档,只会解析在 SoupStrainer 中定义过的文档. 创建一个 SoupStrainer 对象并作为 parse_only 参数给 BeautifulSoup 的构造方法即可.
SoupStrainer
SoupStrainer 类接受与典型搜索方法相同的参数:name , attrs , recursive , string , **kwargs 。下面举例说明三种 SoupStrainer 对象:
from bs4 import SoupStrainer

only_a_tags = SoupStrainer("a")

only_tags_with_id_link2 = SoupStrainer(id="link2")

def is_short_string(string):
    return len(string) < 10

only_short_strings = SoupStrainer(string=is_short_string)
再拿“爱丽丝”文档来举例,来看看使用三种 SoupStrainer 对象做参数会有什么不同:
html_doc = """
<html><head><title>The Dormouse's story</title></head>
    <body>
<p class="title"><b>The Dormouse's story</b></p>

<p class="story">Once upon a time there were three little sisters; and their names were
<a href="http://example.com/elsie" class="sister" id="link1">Elsie</a>,
<a href="http://example.com/lacie" class="sister" id="link2">Lacie</a> and
<a href="http://example.com/tillie" class="sister" id="link3">Tillie</a>;
and they lived at the bottom of a well.</p>

<p class="story">...</p>
"""

print(BeautifulSoup(html_doc, "html.parser", parse_only=only_a_tags).prettify())
# <a class="sister" href="http://example.com/elsie" id="link1">
#  Elsie
# </a>
# <a class="sister" href="http://example.com/lacie" id="link2">
#  Lacie
# </a>
# <a class="sister" href="http://example.com/tillie" id="link3">
#  Tillie
# </a>

print(BeautifulSoup(html_doc, "html.parser", parse_only=only_tags_with_id_link2).prettify())
# <a class="sister" href="http://example.com/lacie" id="link2">
#  Lacie
# </a>

print(BeautifulSoup(html_doc, "html.parser", parse_only=only_short_strings).prettify())
# Elsie
# ,
# Lacie
# and
# Tillie
# ...
#
还可以将 SoupStrainer 作为参数传入 搜索文档树 中提到的方法.这可能不是个常用用法,所以还是提一下:
soup = BeautifulSoup(html_doc)
soup.find_all(only_short_strings)
# [u'\n\n', u'\n\n', u'Elsie', u',\n', u'Lacie', u' and\n', u'Tillie',
#  u'\n\n', u'...', u'\n']
ColorUI
简介
资料
安装配置
布局
.flex:默认主轴方向为横轴
.flex-direction: 设置主轴方向为纵轴
align-[start, center, end]: 设置副轴方向的对齐方式
大小
xs, sm, df, lg, xl
Fess文档
Fess概览
FESS是一家开源全文搜索服务器,可以处理从Web搜索到公司搜索的广泛搜索。它具有丰富的功能,但最大的功能是,它可以轻松安装而无需全文搜索专业知识,并且可以通过指向浏览器来构建搜索系统。
fess 可以通过设置 query_expansion 参数来实现模糊查找,这个参数可以让 fess 在查询时自动扩展一些相关的词语,从而增加匹配的可能性。例如,如果你输入了 “apple”,fess 可能会自动扩展成 “apple OR iphone OR ipad” 等等。这样就可以提高查找的召回率,但是也可能降低查找的准确率。所以你需要根据你的具体需求来调整这个参数的值。
Fess User Guide - Query Expansion
OVERVIEW
BASIC
Getting Started
DOCUMENTATION⭐点开直接看 ,
Installation
启动: ./bin/fess
关闭: kill -15 进程号
备份数据
更新包
备份Configuration
开启Crawler
Administration:⭐
Introduction
Dashboard⭐
面板介绍
System: FessWeb左侧System栏
Wizard页面提供了一个快速的crawler设置工具. 可以快速爬取某个网站的内容
此管理页面管理FESS的配置, 可以在不重新启动FESS的情况下改变FESS的行为。
主要是System, Crawler, Logging, Suggest, LDAP, Notification, Storage等方面, 比如设置Log的级别为Debug.
设置定时任务
管理搜索页面和资源文件,例如图像和CSS文件, 可以自定义搜索界面
管理一些停用词之类的词典.
Kuromoji
kuromoji是日语形态学分析,kuromoji包含自定义词典。只和日语有关, 不用看.
管理access tokens
管理fess的扩展功能, 比如fess要外连数据库的话, 需要下载fes-ds-db-xxxx.jar包并且安装
管理与Amazon S3兼容对象存储服务器Minio上的存储对象。实际上没有这个侧边栏, 在System > General的页面里面, 设置EnDpoint, Access Key, Secret Key, Bucket, 应该是数据挂载能力.
Crawler: FessWeb左侧Crawler栏
设置Web爬虫
设置文件爬虫
设置数据存储爬虫
标签管理, 可以把不同的文件类型, 文件路径打上对应标签
关键词管理, 可以输入关键词和对应的查询, 用于快捷查询, 比如设置数据库关键词的查询为数据库 AND Mysql, 它就会查包含Mysql和数据库的内容
管理文档Boost设置。此功能在索引时间为每个文档的提升分数设置,并在搜索结果中提高特定文档, 是提升特定文档的比重.
管理相关的内容设置。如果搜索查询匹配注册项,则相关内容在搜索结果的顶部显示, 也就是对相关字段进行特殊显示的设置.
管理相关查询设置。此功能通过注册相关查询来帮助用户完善其搜索。相关查询是用户原始搜索词的替代单词的建议, 应该是输入关键词的时候会提示这里设置的对应的查询, 而不是像Key Match一样直接替换.
路径映射用给定的内容替代爬取的URL/路径。在搜索结果页面中,使用替换的内容。
管理在Web爬网上进行身份验证的设置。
管理在文件爬行时进行身份验证的设置
FESS将请求头传递给Web服务器,并在爬取的时候传递给Web服务器。
管理域名, 比如baidu.com到www.baidu.com的映射
User
Suggest
System Info
Search
API
Configuration
TUTORIALS
This page is generated by Machine Translation from Japanese. Pull Request is welcome!
List of published articles
- Part 1: Getting Started with Fess
简单介绍Fess - Part 2: Migrate from GSS to FSS
将Fess的搜索结果嵌入到现有网页, 主要是利用Javascript嵌入到现有网页 - Part 3: Web Scraping with Fess
将Fess作为网络爬虫进行信息收集 - Part 4: Natural Language Processing with Fess
用自然语言处理技术来处理Fess得到的信息 - Part 5: Tokenizing for Full-Text Search
- Part 6: Analyzer in Japanese
- Part 7: Crawling Sites with Authentication
- Part 8: Role-based search
- Part 9: Fess Active Directory integration
利用微软的Active Directory机制来进行权限管理 - Part 10: How to build in Windows environment
- Part 11: Single sign-on with Fess
- Part 12: How to use the virtual host function
通过虚拟主机来为不同的搜索内容进行搜索入口的设置 - Part 13: How to display thumbnail images in search results
- Part 14: How to use the management API⭐
通过Restful的http请求更改Fess的配置 - Part 15: File server crawls that require authentication
- Part 16: How to use the search API
使用Fess提供的search API可以将Fess整合到其他应用, 比如闻达 - Part 17: Database crawl
查找数据库中的数据 - Part 18: Google Drive Crawl
查找google drive内的内容 - Part 19: CSV file crawl
查找CSV文件内容
DEVELOPMENT
OTHERS
ARCHIVES
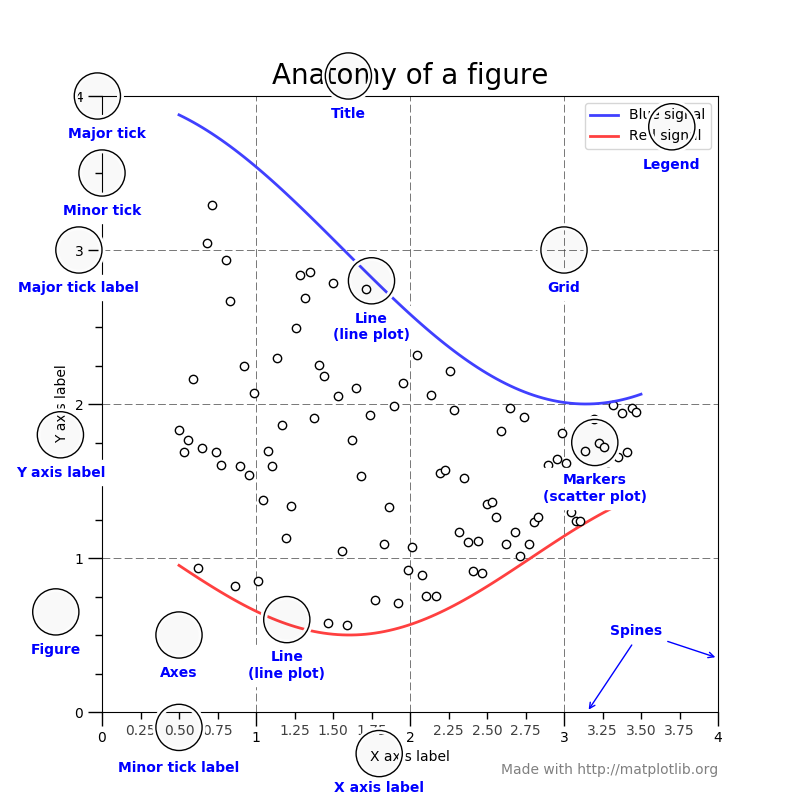
matplotlib
简介
matplotlib官网Tutorialhttps://matplotlib.org/3.5.0/tutorials/introductory/usage.html#parts-of-a-figure
UsageGuide
图像的术语解释
Plot接收的参数
plotting functions 都只接收numpy.array或者numpy.ma.masked_array作为输入. 其他的array-like的比如panda的数据或者numpy.matrix都不能作为输入, 所以需要转换.
转换panda.DataFrame
a = pandas.DataFrame(np.random.rand(4, 5), columns = list('abcde'))
a_asarray = a.values
转换numpy.matrix
b = np.matrix([[1, 2], [3, 4]])
b_asarray = np.asarray(b)
面向对象的接口和pyplot接口
使用Matplotlib的两种方法:
- 创建
figures(数字)和axes(轴), 然后再这两个对象上调用方法(OO-style). - 依赖
pyplot自动创建和管理figure和axes, 然后用pyplot的函数来 plot(pyplot-style).
OO-style
x = np.linspace(0, 2, 100)  # Sample data.

# Note that even in the OO-style, we use `.pyplot.figure` to create the figure.
fig, ax = plt.subplots()  # Create a figure and an axes.
ax.plot(x, x, label='linear')  # Plot some data on the axes.
ax.plot(x, x**2, label='quadratic')  # Plot more data on the axes...
ax.plot(x, x**3, label='cubic')  # ... and some more.
ax.set_xlabel('x label')  # Add an x-label to the axes.
ax.set_ylabel('y label')  # Add a y-label to the axes.
ax.set_title("Simple Plot")  # Add a title to the axes.
ax.legend()  # Add a legend.
pyplot-style
x = np.linspace(0, 2, 100)  # Sample data.

plt.plot(x, x, label='linear')  # Plot some data on the (implicit) axes.
plt.plot(x, x**2, label='quadratic')  # etc.
plt.plot(x, x**3, label='cubic')
plt.xlabel('x label')
plt.ylabel('y label')
plt.title("Simple Plot")
plt.legend()
绘图结果
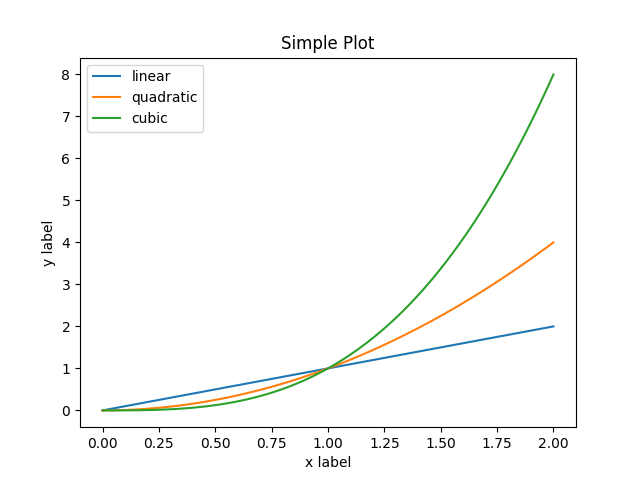
注意
还有第三种在GUI调用的方法, 这里不详细解释.
Matplotlib对于两种风格的调用形式都有文档, 不过推荐坚持一种风格的而不是混用他们, 一般建议在有交互的绘画中(比如在Jupyter notebook)中用pyplot-style, 而在无交互的绘画中有OO-style.
Nginx
Nginx配置文件详解 详细讲解了nginx配置文件分为哪些块 以及常见的配置文件结构
通常Server配置在独立的/etc/nginx/conf.d/*.conf中,通过引用的方式调用,如下/etc/nginx/conf.d/default.conf:
Pandas
Pandas主要由 Series 和 DataFrame 两种数据结构, Series可以看作一个一维数组(列), 不过其”下标”不仅可以是数字, 还可以是字符串也就是标签, 而 DataFrame 可以是二维数组, 不过既有行索引也有列索引, 也可以看做是Series的字典, 比如一列是一个Series, 然后行索引就是Series的索引(共用行索引), 而列索引就是字典的key.
Series
Series类有构造器/属性/函数, 系统的可以分为以下种类:
- Constructor
- Attributes
- Conversion
- Indexing, iteration
- Binary oprator functions
- Function application, GroupBy & window
- Computations / descriptive stats
- Reindexing / selction / label manipulation
- Missing data handling
- Reshaping, sorting
- Combining / comparing / joinning / merging
- Time Series-related
- Accessors(增强一些数据的处理和获取能力)
- Datetimelike properties
- String handling
- Categorical accessor
- Sparse accessor
- Flags
- Metadata
- Plotting
- Serialization / IO / conversion
DataFrame
DataFrame的Api分类也和Series差不多.
- Constructor
- Attributes and underlying data
- Conversion
- Indexing, iteration
- Binary oprator functions
- Function application, GroupBy & window
- Computations / descriptive stats
- Reindexing / selction / label manipulation
- Missing data handling
- Reshaping, sorting
- Combining / comparing / joinning / merging
- Time Series-related
- Flags
- Metadata
- Plotting
- Sparse accesspr
- Serialization / IO / conversion
pandas arrays, scalars, and data types
pandas大多数采用NumPy+index/Series/DataFrame的混合对象, 其它一些数据类型 则是扩充了NumPy的类型体系.
pandas有以下数据类型:
- Datetime data
- Timedelta data (时间变化)
- Timespan data (时间区间, 时期, 见Period)
- Period (时间区间, 时期)
- Interval data(
- Nullable integer
- Categorical data
- Sparse data
- Text data
- Boolean data with missing values
Index objects
- index 用于索引和对齐的不可变序列
- Properties
- Modifying and computations
- Compatility with MultiIndex
- Missing values
- Conversion
- Sorting
- Time-specific operations
- Combining / joining / set operations
- Selecting
- Numeric Index
- CategoricalIndex
- IntervalIndex
- MultiIndex
- DatetimeIndex
- TimedeltaIndex
- PeriodIndex
Data offsets
Window
GroupBy
Resampling
Style
Plotting
General uility functions
Extensions
PJSIP
简介
PJSIP 是一个用C语言实现标准基础协议(SIP, SDP, RTP, STUN, TURN, ICE)开源多媒体通信框架. 它将SIP与多媒体框架和NAT穿越结合起来形成了更高层次的API, 体积很小很简便, 可以在各种桌面电脑, 嵌入式系统, 移动设备中使用.
PJSIP同时支持语音、视频、状态呈现和即时通讯。PJSIP具有非常完善的文档,对开发者非常友好。
PJSIP采用双License:GPLv2以及商业许可证,开发者可以根据需要选择不同的License。
组成
资料
安装配置
PJsua
简介
资料
安装配置
模块
PyQT5
简介
Python官方提供的GUI框架是Tklnter, QT提供的GUI框架(Python)是PySide, 而PyQT5是用python实现了QT的v5版本.
资料
安装
pip install PyQt5
QT
简介
QT是一个跨平台的C++应用程序开发框架。广泛用于开发GUI程序,这种情况下又被称为部件工具箱。也可用于开发非GUI程序,例如控制台工具和服务器。
资料
工具
Qt提供了一些命令行和图形工具,以方便和加速开发的过程。
- Qt Creator:轻量级的Qt/C++ IDE开发环境。
- qmake:跨平台构建工具,可简化跨不同平台进行项目开发的构建过程。
- Qt Designer:界面设计师。可以用拖拽的方式将Widget排放在界面上,支持版面配置,支持信号与槽编辑。
- Qt Assistant:Qt助手。Qt在线帮助文件查看工具。
- Qt Liguist:翻译工具。读取翻译文件(如.ts、.po)并为翻译人员提供友好的翻译接口。
- lupdate:从源代码文件或其他资源文件中提取需要翻译的字符串,并将之存入xml格式的.ts文件中。
- lrelease:负责将.ts文件转化为程序使用的.qm文件。.qm档会去掉.ts档中所有的空白和未翻译的内容,并将存储格式压缩。
- lconvert:用于翻译文件之间的格式转换。
- Qt Visual Studio Add-in:Visual Studio集成
- Qt Eclipse Integration:Eclipse集成
举例
咪咕咪咕, wps, YY语音等程序.
QT模块
经过多年发展,Qt不但拥有了完善的C++图形库,而且近年来的版本逐渐集成了数据库、OpenGL库、多媒体库、网络、脚本库、XML库、WebKit库等等,其核心库也加入了进程间通信、多线程等模块.
下列模块提供一般的软件开发
- QtCore—QtCore模块是所有基于Qt的应用程序的基础,提供信号与槽的对象间通信机制、IO、事件和对象处理、多线程
- QtGui—包含了开发图形用户界面应用程序所需的功能。使用其支持的各个平台的原生图形API。支持反锯齿、向量形变。支持ARGB顶层widget
- QtMultimedia—提供了用于多媒体内容处理的QML类型集和C++类集。同时提供访问摄像头及音频功能的API。包含的Qt音频引擎支持三维音频回放及管理。
- QtNetwork—提供了网络程序设计功能。支持通用协议,如HTTP、FTP和DNS,包括对异步HTTP 1.1的支持。与较低层的TCP/IP和UDP协议,如QTcpSocket、QTcpServer和QUdpSocket
- QtOpenGL—提供在应用程序中使用OpenGL和OpenGL ES加入3D图形。在Windows平台上亦支持Direct3D
- QtOpenVG-提供OpenVG绘图支持的一个插件
- QtScript—包含完全集成的ECMA标准脚本引擎。提供信号与槽机制简化对象间通信和QtScript调试程序。
- QtScriptTools—额外的Qt Script组件
- QtSql—将数据库集成至应用程序。支持所有主要的数据库驱动包括ODBC、MySQL、PSQL、SQLite、ibase、Oracle、Sybase、DB2。
- QtSvg—支持SVG格式
- QtWebKit—集成WebKit,提供了HTML浏览器引擎,便于在原生应用程序中嵌入网络内容和服务。
- QtXml—提供了XML文档的阅读器和编写器、支持SAX和DOM。
- QtXmlPatternsl—提供了XQuery和XPath引擎支持。
- Phonon—集成Phonon,支持跨平台应用程序播放音频和视频内容。Qt5开始不支持Phonon。
- Qt3Support—模块提供兼容Qt 3.х.х版本的程序库
- QtDeclarative [34] - engine for declaratively building fluid user interfaces in QML
作业于Qt附带工具的模块
- QtDesigner—提供扩展Qt Designer的类别。
- QtUiTools
- QtHelp—协助集成在线文件到应用程序中。
- QtTest—提供单元测试框架和鼠标和键盘模拟功能。集成Visual Studio和KDevelop。
下列模块用于Unix开发
- QtDBus
下列模块用于Windows开发
- QAxContainer
- QAxServer
图形用户界面
Qt的图形用户界面的基础是QWidget。Qt中所有类型的GUI组件如按钮、标签、工具栏等都派生自QWidget,而QWidget本身则为QObject的子类。Widget负责接收鼠标,键盘和来自窗口系统的其他事件,并描绘了自身显示在屏幕上。每一个GUI组件都是一个widget,widget还可以作为容器,在其内包含其他Widget。
QWidget不是一个抽象类别。并且可以被放置在一个已存在的用户界面中;若是Widget没有指定父Widget,当它显示时就是一个独立的视窗、或是一个顶层widget。QWidget显示能力包含了透明化及Double-Buffering。Qt提供一种托管机制,当Widget于创建时指定父对象,就可把自己的生命周期交给上层对象管理,当上层对象被释放时,自己也被释放。确保对象不再使用时都会被删除。
信号与槽
Qt利用信号与槽(signals/slots)机制取代传统的callback来进行对象之间的沟通。当操作事件发生的时候,对象会发提交一个信号(signal);而槽(slot)则是一个函数接受特定信号并且执行槽本身设置的动作。信号与槽之间,则透过QObject的静态方法connect来链接。
信号在任何执行点上皆可发射,甚至可以在槽里再发射另一个信号,信号与槽的链接不限定为一对一的链接,一个信号可以链接到多个槽或多个信号链接到同一个槽,甚至信号也可连接到信号。
以往的callback缺乏类型安全,在调用处理函数时,无法确定是传递正确类型的参数。但信号和其接受的槽之间传递的资料类型必须要相符合,否则编译器会提出警告。信号和槽可接受任何数量、任何类型的参数,所以信号与槽机制是完全类型安全。
信号与槽机制也确保了低耦合性,发送信号的类别并不知道是哪个槽会接受,也就是说一个信号可以调用所有可用的槽。此机制会确保当在”连接”信号和槽时,槽会接受信号的参数并且正确执行。
布局管理
布局管理类别用于描述一个应用程序的用户界面中的Widget是如何放置。当视窗缩放时,布局管理器会自动调整widget的大小、位置或是字号,确保他们相对的排列和用户界面整体仍然保有可用性。
Qt内置的布局管理类型有:QHBoxLayout、QVBoxLayout、QGridLayout和QFormLayout。这些类别继承自QLayout,但QLayout非继承自QWidget而是直接源于QObject。他们负责widget的几何管理。想要创建更复杂的版面配置,可以继承QLayout来自定义版面配置管理员。
- QHBoxLayout:配置widget成横向一列
- QVBoxLayout:配置widget成垂直一行
- QGridLayout:配置widget在平面网格
- QFormLayout:配置widget用于2栏标签- field
Main Window
Qt提供了下列主视窗管理和相关的用户界面组件的类别:
- QMainWindow:提供一个标准的应用程序主视窗。当中可以包括菜单、工具栏、状态栏、停驻组件等组件。
- QDockWidget:提供了一个可用于创建弹簧工具调色板或辅助窗口的widget。Dock widgets可以移、关闭、浮动为外部视窗。
- QToolBar:提供了一个通用的工具栏widget,可以放入一些不同的action有关的工具,如按钮、下拉菜单、comboboxes和spin boxes。
Graphics View
Graphics View提供了用于管理和交互大量定制的2D图形对象的平面以及可视化显示对象的视图widget,并支持缩放和旋转功能。
整个Graphics View框架提供一个以Item为基础的model-view设计。由3个主要的类别组成,分别是QGrphicsItem、QGraphicsScene和QGraphicsView。若干View可以显示一个Scene,Scene中则包含不同几何形状的Item。
该框架包括一个事件传播的架构,让在Scene上的Item有双精度的交互能力。Item可以处理键盘事件,鼠标按下、移动、释放和双击事件,他们也可以跟踪鼠标移动。
无障碍环境
无障碍环境需要无障碍兼容的应用程序、辅助技术、以及辅助工具之间的合作。应用程序通常不会直接沟通辅助工具,而是通过一个辅助技术,这是一个应用程序和工具之间信息交流的桥梁。用户界面元素相关消息,例如按钮和滚动条,使用辅助技术来显示。
国际化
Qt的字体引擎能够在同一时间正确的显示各种不同的书写系统。并且Qt内部使用Unicode编码来存储文字。
Qt的多国语言支持技术,可以让应用程序中的文字全部使用英文撰写,能够在完全不需修改程序的状况下,改变整个应用程序中的文字为另一个语系的文字,并能够协助处理不同语言的单、复数问题。
独立的翻译文件使得新增支持语言相当容易,同时翻译文件(.ts)为XML格式可以直接编辑或使用Qt Liguist进行翻译,可让无程序开发能力的翻译者亦能独自完成翻译。Qt附带的工具程序就能够自动抽取需要翻译的文字产生翻译文件。
多线程
Qt的线程支持是独立于平台的线程类别,采用信号与槽机制,实现类型安全的线程间通讯。这使得它易于开发具可移植性的多线程Qt应用程序。并能充分利用多核架构,获得最佳运行性能,还能根据可用的处理器内核数自动调整使用的线程数。多线程程序设计也是一个执行耗时操作而不会冻结用户界面的有效典范。
语言绑定
除了C++外,Qt还为其它多种计算机语言提供了应用程序接口,您也可以使用这些语言开发Qt应用程序。
Hello world
编写
#include <QtWidgets/QApplication>
#include <QtWidgets/QLabel>

int main(int argc, char *argv[])
{
    QApplication app(argc, argv);
    QLabel label("Hello, world!");
    label.show();
    return app.exec();
}
编译与执行
新建一个文件夹,命名为Hello
将代码Hello.cpp放入Hello文件夹
在Hello文件夹执行下列命令
qmake -projectqmakemake/gmake/nmake这个取决于您的系统与编译器设置
执行./release/Hello(在Windows中是release\Hello.exe)
Spring Securities
前言
1.先决条件
服务器应用
移动应用
快速上手
环境准备
pom.xml导入所需依赖
        <dependency>
            <groupId>org.springframework.boot</groupId>
            <artifactId>spring-boot-starter-thymeleaf</artifactId>
        </dependency>
        <dependency>
            <groupId>org.springframework.boot</groupId>
            <artifactId>spring-boot-starter-security</artifactId>
            <version>2.3.3.RELEASE</version>
        </dependency>
        <dependency>
            <groupId>org.thymeleaf.extras</groupId>
            <artifactId>thymeleaf-extras-springsecurity5</artifactId>
            <version>3.0.4.RELEASE</version>
        </dependency>
config/SecurityConfig类配置
@Configuration
@EnableWebSecurity
public class SecurityConfig extends WebSecurityConfigurerAdapter {

    protected void configure(final AuthenticationManagerBuilder auth) throws Exception {
        auth.inMemoryAuthentication()
                .withUser("user1").password(passwordEncoder().encode("user1Pass")).roles("USER")
                .and()
                .withUser("user2").password(passwordEncoder().encode("user2Pass")).roles("USER")
                .and()
                .withUser("admin").password(passwordEncoder().encode("adminPass")).roles("ADMIN");
    }

    @Bean
    public PasswordEncoder passwordEncoder() {
        return new BCryptPasswordEncoder();
    }

    @Override
    protected void configure(final HttpSecurity http) throws Exception {
        http
                .authorizeRequests()
                // 仅有admin角色的用户可以访问`/admin`页面
                .antMatchers("/").permitAll()
                .antMatchers("/admin/**").hasRole("ADMIN")
                .antMatchers("/anonymous*").anonymous()
                .antMatchers("/login").permitAll()      // 允许所有人访问`/login`登录页面
                .anyRequest().authenticated()
                .and()
                .formLogin()
                .loginPage("/login")                    ///login为登陆页面,并且SpirngMVC需要设置一个简单的Controller
                .loginProcessingUrl("/perform_login")   //登陆处理链接, 这里的链接要与用户名密码表单的提交要保持一致
                .defaultSuccessUrl("/homepage", true)   //如果用户名密码通过验证,则跳转到这个路由
                .failureUrl("/login.html?error=true")   //登陆失败跳转到这里的路由
//                .failureHandler(authenticationFailureHandler())
                .and()
                .logout()
                .logoutUrl("/perform_logout")           //处理登出的路由
                .deleteCookies("JSESSIONID");           //登陆成功后http有一个名为JSESSIONID的cookie创建
//                .logoutSuccessHandler(logoutSuccessHandler());
        // ...
    }

}
controller/LoginController
@Controller
class LoginController {
    @GetMapping("/login")
    String login(Model model) {
        model.addAttribute("msg","hello");
        return "login";
    }

    @RequestMapping("homepage")
    public String hello() {
        return "homepage";
    }
}
templates/login.html
<!DOCTYPE html>
<html  xmlns:th="https://www.thymeleaf.org" >

<head>
    <title>Please Log In</title>
</head>
<body>
<h1>Please Log In</h1>
<div th:if="${param.error}">
    Invalid username and password.</div>
<div th:if="${param.logout}">
    You have been logged out.</div>
<form th:action="@{/perform_login}" method="post">
    <div>
        <input type="text" name="username" placeholder="Username"/>
    </div>
    <div>
        <input type="password" name="password" placeholder="Password"/>
    </div>
    <input type="submit" value="Log in" />
</form>
</body>
</html>
templates/homepage.html
<!DOCTYPE html>
<html lang="en" xmlns:th="http://www.thymeleaf.org"
      xmlns:sec="http://www.thymeleaf.org/thymeleaf-extras-springsecurity5">
<head>
    <meta charset="UTF-8">
    <title>homepage</title>
</head>
<body>
<div><text>homepage</text></div>
<div sec:authorize="!isAuthenticated()">
    <a class="item" th:href="@{/login}">
        <i class="address card icon">登录</i>
    </a>
</div>
<div sec:authorize="isAuthenticated()">
    <a class="item">
        <i class="address card icon"></i>
        用户名:<span sec:authentication="principal.username"></span>
        角色:<span sec:authentication="principal.authorities"></span>
    </a>
</div>

</body>
</html>
登陆过程
在未登录前, homepage.html如图所示, 因为thymeleaf和springsecurity的结合, 可以通过!isAuthenticated()判断是否登陆来显示对应的内容:
点击登陆按钮(绑定login跳转链接), 通过controller的 login 跳转到login.html页面进行登陆, 登陆页面的登陆处理连接为perform_login与SecurityConfig相对应, 注意, 自己并没有perform_login这个路由定义, 而是SpringSecurity提供的
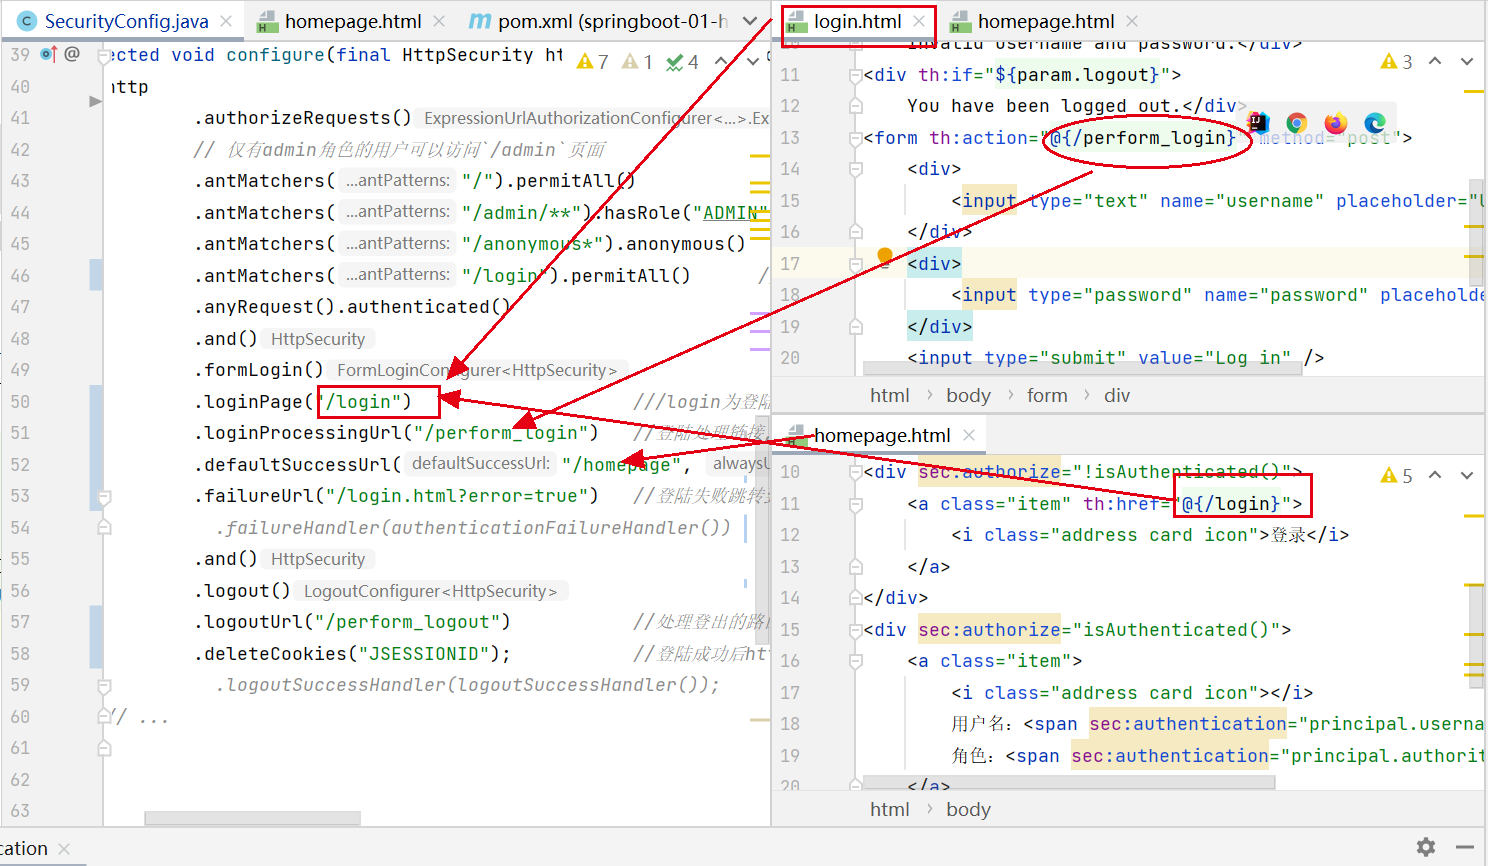
登陆成功后, 跳转到homepage页面, 并且显示登陆后才可见的内容
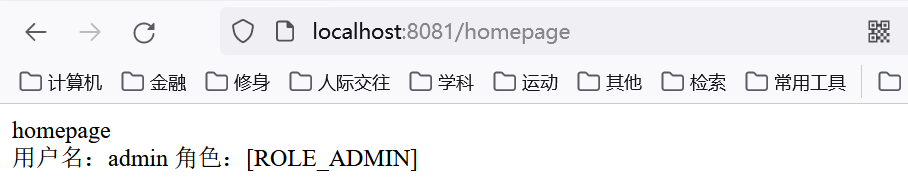
可以看到, 我们自定义的角色是 ADMIN , 而SpringSecurity会在它的内部变量principal.authorities加上ROLE_的前缀, 这个prngcipal的变量是SpringSecurity内置的.
Transformer
- GET STARTED provides a quick tour of the library and installation instructions to get up and running.
- TUTORIALS are a great place to start if you’re a beginner. This section will help you gain the basic skills you need to start using the library.
- HOW-TO GUIDES show you how to achieve a specific goal, like finetuning a pretrained model for language modeling or how to write and share a custom model.
- CONCEPTUAL GUIDES offers more discussion and explanation of the underlying concepts and ideas behind models, tasks, and the design philosophy of 🤗 Transformers.
- API describes all classes and functions:
- MAIN CLASSES details the most important classes like configuration, model, tokenizer, and pipeline.
- MODELS details the classes and functions related to each model implemented in the library.
- INTERNAL HELPERS details utility classes and functions used internally.
GET STARTED
TUTORIALS
HOW-TO-GUIDES
CONCEPTUAL GUIDES
API
Uni-App
介绍
什么是uni-app
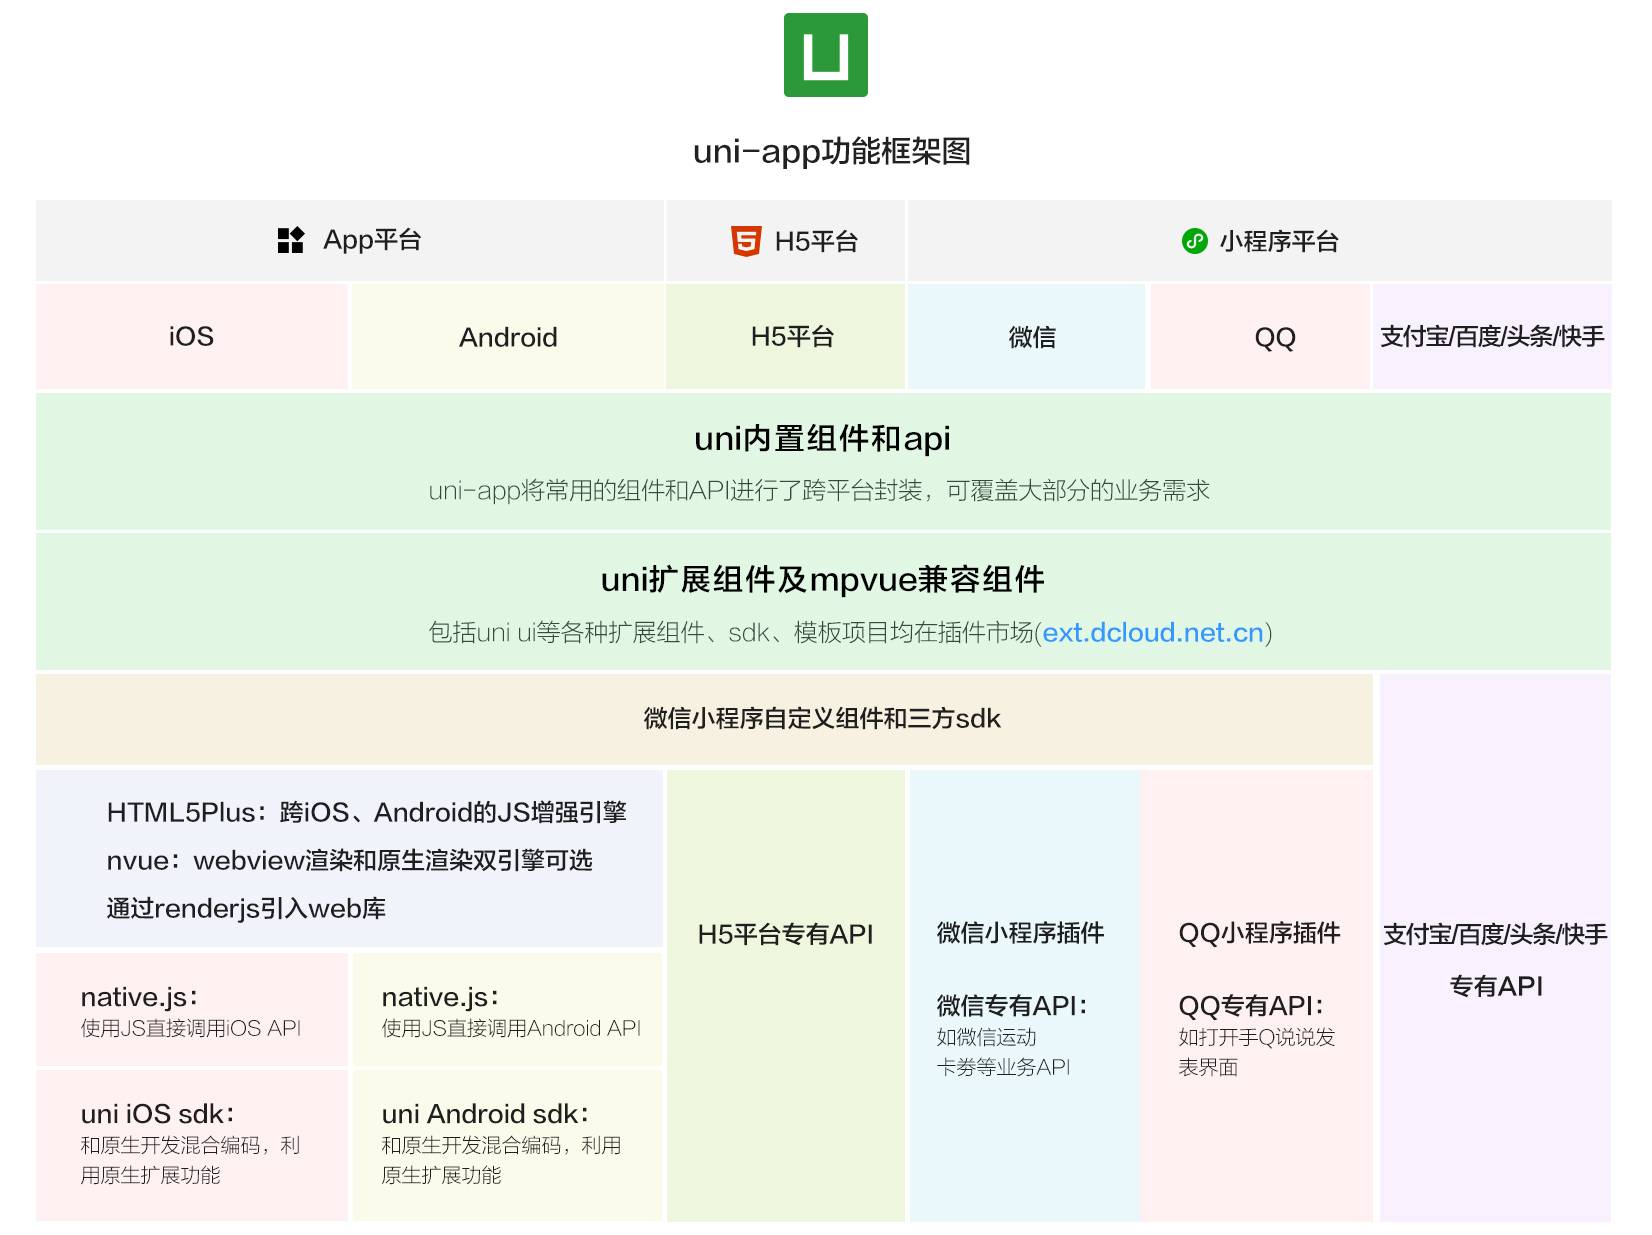
uni-app是基于Vue.js的开发一套,部署多端的前端应用框架.
uni-app功能框架图:
快速上手
uni-app可以通过可视化界面HBuilderX, 命令行vue-cli两种方式创建项目.
HBuilder X
vue-cli
如何学习*
如果熟悉h5, 但是不熟悉vue, 小程序:白话uni-app 【也是html、vue、小程序的区别】
如果熟悉小程序, 但是不熟悉vue:vue和微信小程序的区别、比较
跨端注意
https://uniapp.dcloud.io/matter.html
常见问题
uni-app 中可使用的 UI 框架:https://ask.dcloud.net.cn/article/35489[ ](https://ask.dcloud.net.cn/article/35489)
组件的概念
组件是现代开发的重要里程碑。组件重构了分工模型,让大量的轮子出现,让开发者可以拿来轮子直接用,大幅提升了整个产业的效率。
uni-app是有内置组件的。这和web开发不一样。
web开发基本上不用基础组件,都是找一个三方ui库,全套组件都包含。那是因为html的基础组件默认样式不适配手机风格。
但uni-app体系不是这样,内置组件就是为手机优化的。但内置组件只能满足基础需求,更多场景,需要扩展组件。
扩展组件是基于内置组件的二次封装,从性能上来讲,扩展组件的性能略低于内置组件,所以开发者切勿抛弃内置组件,直接全套用三方UI组件库。uni-app的插件市场,有很多扩展组件,有的是单独的,有的是成套的。
有些开发者喜欢成套的组件,但注意成套扩展组件也不可能覆盖所有需求,很多场景还是需要单独下载专业组件。扩展组件的选择
众多扩展组件如何选择?我们首先要搞清楚组件的分类。
组件分2大类:1、vue组件(文件后缀为vue);2、小程序自定义组件(文件后缀为wxml或其他小程序平台特有后缀名称)
- vue组件又分为2个细项:only for web、全端兼容
- 小程序组件又分为:微信/QQ小程序组件、阿里小程序组件、百度小程序组件、字节跳动小程序组件。
这些组件uni-app都支持,但受组件本身技术特点限制,在不同端有不一样的支持度。
下面这张表格,可以清楚的表达不同类型的组件的兼容性。- 从表格中可以很明显看出,更推荐使用的是全端兼容的uni规范组件。
插件市场更多组件
插件市场,https://ext.dcloud.net.cn,有各种玲琅满目的组件、模板。
其中成套的全端兼容ui库包括:
- uViewUI:整合了非常多组件,功能丰富、文档清晰,但不支持nvue
- colorUI css库:颜值很高,css库而非组件
- unify UI:全端支持的组件库,侧重nvue
- mypUI:全端支持的组件库,侧重nvue
- ThorUI组件库
- graceUI商业库

uni-app 导航栏开发指南:https://ask.dcloud.net.cn/article/34921
uni-app 实现全局变量: https://ask.dcloud.net.cn/article/35021
uni-app 引用 npm 第三方库: https://ask.dcloud.net.cn/article/19727[ ](https://ask.dcloud.net.cn/article/19727)
uni-app 中使用微信小程序第三方 SDK 及资源汇总:https://ask.dcloud.net.cn/article/35070
原生控件层级过高无法覆盖的解决方案:https://uniapp.dcloud.io/component/native-component[ ](https://uniapp.dcloud.io/component/native-component)
国际化/多语言/i18n方案:https://ask.dcloud.net.cn/article/35872[ ](https://ask.dcloud.net.cn/article/35872)
本地存储详解:https://ask.dcloud.net.cn/article/166[ ](https://ask.dcloud.net.cn/article/166)
其它项目转uni-app
uni-app可以多端输出,也欢迎各平台之前的老项目向uni-app转换迁移。
vue h5项目转换uni-app指南:https://ask.dcloud.net.cn/article/36174
微信小程序转换uni-app指南及转换器:https://ask.dcloud.net.cn/article/35786
wepy转uni-app转换器:https://github.com/zhangdaren/wepy-to-uniapp
另一种有效的wepy转uni-app方法: https://ask.dcloud.net.cn/article/39125
mpvue 项目(组件)迁移指南、示例及资源汇总: https://ask.dcloud.net.cn/article/34945
教程
概念简介
开发规范
uni-app约定如下开发规范:
页面文件遵循 Vue单文件组件(SFC)规范
组件标签靠近小程序规范 uni-app 组件规范
接口能力(JS API)靠近微信小程序规范, 前缀由
wx替换为uni, 详见uni-app接口规范数据绑定及事件处理同
Vue.js规范, 同时补充了App及页面的声明周期为兼容多端运行, 建议使用flex布局进行开发
工程目录
一个uni-app工程, 就是一个Vue项目, 快速上手创建项目, 目录结构为:
┌─uniCloud 云空间目录,阿里云为uniCloud-aliyun,腾讯云为uniCloud-tcb(详见uniCloud)
│─components 符合vue组件规范的uni-app组件目录
│ └─comp-a.vue 可复用的a组件
├─hybrid App端存放本地html文件的目录,详见
├─platforms 存放各平台专用页面的目录,详见
├─pages 业务页面文件存放的目录
│ ├─index
│ │ └─index.vue index页面
│ └─list
│ └─list.vue list页面
├─static 存放应用引用的本地静态资源(如图片、视频等)的目录,注意:静态资源只能存放于此
├─uni_modules 存放uni_module规范的插件。
├─wxcomponents 存放小程序组件的目录,详见
├─main.js Vue初始化入口文件
├─App.vue 应用配置,用来配置App全局样式以及监听 应用生命周期
├─manifest.json 配置应用名称、appid、logo、版本等打包信息,详见
├─pages.json 配置页面路由、导航条、选项卡等页面类信息,详见
└─uni.scss 这里是uni-app内置的常用样式变量
Tips
- 编译到任意平台时,
static目录下的文件均会被完整打包进去,且不会编译。非static目录下的文件(vue、js、css 等)只有被引用到才会被打包编译进去。 static目录下的js文件不会被编译,如果里面有es6的代码,不经过转换直接运行,在手机设备上会报错。css、less/scss等资源不要放在static目录下,建议这些公用的资源放在自建的common目录下。- HbuilderX 1.9.0+ 支持在根目录创建
ext.json、sitemap.json等小程序需要的文件。
| 有效目录 | 说明 |
|---|---|
| app-plus | App |
| h5 | H5 |
| mp-weixin | 微信小程序 |
| mp-alipay | 支付宝小程序 |
| mp-baidu | 百度小程序 |
| mp-qq | QQ小程序 |
| mp-toutiao | 字节小程序 |
| mp-lark | 飞书小程序 |
| mp-kuaishou | 快手小程序 |
| mp-jd | 京东小程序 |
页面
页面简介
uni-app项目中, 一个页面就是一个符合Vue SFC规范的.vue或者.nvue文件.
.vue和.nvue都是支持全平台, 区别不同的是发行到app平台时, .vue文件会使用webview进行渲染, ,nvue会使用原生渲染.
新建页面
页面在工程根目录下app下, 每次新建页面需要在page.json中配置page列表.
删除页面
- 删除
page下的.vue文件 - 删除
page.json=>pages列表中的配置
应用首页
page.json=>pages列表中第一个页面是程序首页.
生命周期
常用的生命周期函数
- oinInit: 监听页面初始化
- onLoad: 监听页面加载, 参数为上个页面传递的数据, 参数类型为object
- onShow: 监听页面显示
- onReady: 监听页面初次渲染完成
- onHide: 监听页面隐藏
- onUnload: 监听页面卸载
- onPullDownRefresh: 监听用户下拉动作
- onReachBottom: 页面滚动到底部的事件, 用于下拉下一页数据
- onTabItemTap: 点击tab时触发
Tips:
onReachBottom使用注意 可在pages.json里定义具体页面底部的触发距离onReachBottomDistance,比如设为50,那么滚动页面到距离底部50px时,就会触发onReachBottom事件。
页面调用接口
getApp()
getApp()函数用于获取当前应用实例, 一般用于获取globalData.
实例
const app = getApp()
console.log(app.globalData)
getCurrentPages()
getCurrentPages() 函数用于获取当前页面栈的实例,以数组形式按栈的顺序给出,第一个元素为首页,最后一个元素为当前页面。
注意: getCurrentPages()仅用于展示页面栈的情况,请勿修改页面栈,以免造成页面状态错误。
每个页面实例有两个方法属性:
- page.$getAppWebview() 获取当前页面的webview对象实例
- page.route 获取当前页面的路由
Tips:
navigateTo,redirectTo只能打开非tabBar页面.switchTab只能打开tabBar页面reLaunch可以打开任意页面- 只要是定义为
tabBar的页面, 底部都有tabBar. - 不能在
App.vue里面进行页面跳转.
$getAppWebview()
此方法是从getCurrentPages()获得的页面里内置了的方法, 仅限于app, 可以获得当前webview的对象实例, 从而可以对webview进行一些控制, 但是uni-app有自己的窗口管理机制, 所以请不要自己创建和销毁webview.
页面通讯
uni.$emit(eventName,OBJECT)
触发全局的自定义事件。附加参数都会传给监听器回调。
| 属性 | 类型 | 描述 |
|---|---|---|
| eventName | String | 事件名 |
| OBJECT | Object | 触发事件携带的附加参数 |
代码实例:
uni.$emit('update',{msg:'页面更新'})
uni.$on(eventName,callback)
监听全局的自定义事件。事件可以由 uni.$emit 触发,回调函数会接收所有传入事件触发函数的额外参数。
| 属性 | 类型 | 描述 |
|---|---|---|
| eventName | String | 事件名 |
| callback | Function | 事件的回调函数 |
代码
    uni.$on('update',function(data){
        console.log('监听到事件来自 update ,携带参数 msg 为:' + data.msg);
    })
uni.$once(eventName,callback)
监听全局的自定义事件。事件可以由 uni.$emit 触发,但是只触发一次,在第一次触发之后移除监听器。
| 属性 | 类型 | 描述 |
|---|---|---|
| eventName | String | 事件名 |
| callback | Function | 事件的回调函数 |
代码示例
    uni.$once('update',function(data){
        console.log('监听到事件来自 update ,携带参数 msg 为:' + data.msg);
    })
uni.$off([eventName, callback])
移除全局自定义事件监听器。
| 属性 | 类型 | 描述 |
|---|---|---|
| eventName | Array<String> | 事件名 |
| callback | Function | 事件的回调函数 |
Tips
- 如果没有提供参数,则移除所有的事件监听器;
- 如果只提供了事件,则移除该事件所有的监听器;
- 如果同时提供了事件与回调,则只移除这个回调的监听器;
- 提供的回调必须跟$on的回调为同一个才能移除这个回调的监听器;
代码示例
$emit、$on、$off常用于跨页面、跨组件通讯,这里为了方便演示放在同一个页面
    <template>
        <view class="content">
            <view class="data">
                <text>{{val}}</text>
            </view>
            <button type="primary" @click="comunicationOff">结束监听</button>
        </view>
    </template>

    <script>
        export default {
            data() {
                return {
                    val: 0
                }
            },
            onLoad() {
                setInterval(()=>{
                    uni.$emit('add', {
                        data: 2
                    })
                },1000)
                uni.$on('add', this.add)
            },
            methods: {
                comunicationOff() {
                    uni.$off('add', this.add)
                },
                add(e) {
                    this.val += e.data
                }
            }
        }
    </script>

    <style>
        .content {
            display: flex;
            flex-direction: column;
            align-items: center;
            justify-content: center;
        }

        .data {
            text-align: center;
            line-height: 40px;
            margin-top: 40px;
        }

        button {
            width: 200px;
            margin: 20px 0;
        }
    </style>
注意事项
uni.$emit、 uni.$on 、 uni.$once 、uni.$off触发的事件都是 App 全局级别的,跨任意组件,页面,nvue,vue 等- 使用时,注意及时销毁事件监听,比如,页面 onLoad 里边
uni.$on注册监听,onUnload 里边uni.$off移除,或者一次性的事件,直接使用uni.$once监听
路由
uni-app页面由框架统一管理, 开发者需要在pages.json里配置每个路由页面的路径及页面样式, 如果希望以Vue Router管理路由, 插件市场上搜索Vue Router
页面栈
框架以栈的方式管理当前所有页面, 当发生路由切换的时候, 页面栈表现如下:
| 路由方式 | 页面栈表现 | 触发时机 |
|---|---|---|
| 初始化 | 新页面入栈 | uni-app 打开的第一个页面 |
| 打开新页面 | 新页面入栈 | 调用 API uni.navigateTo 、使用组件 |
| 页面重定向 | 当前页面出栈,新页面入栈 | 调用 API uni.redirectTo 、使用组件 |
| 页面返回 | 页面不断出栈,直到目标返回页 | 调用 API uni.navigateBack 、使用组件 |
| Tab 切换 | 页面全部出栈,只留下新的 Tab 页面 | 调用 API uni.switchTab 、使用组件 |
| 重加载 | 页面全部出栈,只留下新的页面 | 调用 API uni.reLaunch 、使用组件 |
页面代码规范介绍
uni-app页面必须形如以下格式:
<template>
    <view>
    ...
    </view>
</template>
uni-app页面中用<template></template>和<block></block>包裹元素进行列表渲染和条件渲染, 不过推荐使用<template></template>使得各平台表现一致.(<block></bolck>是微信小程序用的)
nvue和vue开发常见区别
组件生命周期
uni-app的组件生命周期和vue标准组件生命周期相同.
| 函数名 | 说明 | 平台差异 |
|---|---|---|
| beforeCreate | 在实例初始化之后被调用 | |
| created | 在实例创建完成后被立即调用 | |
| beforeMount | 在挂载开始之前被调用 | |
| mounted | 挂在到实例上之后调用 | |
| beforeUpdate | 数据更新时调用,发生在虚拟 DOM 打补丁之前。 | 仅H5平台支持 |
| updated | 由于数据更改导致的虚拟 DOM 重新渲染和打补丁,在这之后会调用该钩子。 | 仅H5平台支持 |
| beforeDestroy | 实例销毁之前调用。在这一步,实例仍然完全可用。 | |
| destroyed | Vue 实例销毁后调用。调用后,Vue 实例指示的所有东西都会解绑定,所有的事件监听器会被移除,所有的子实例也会被销毁。 |
互相引用
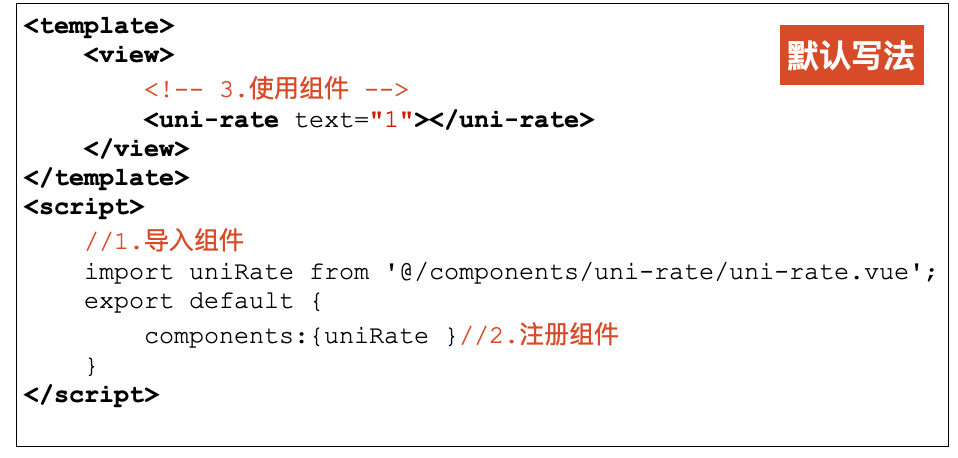
引用组件
vue2.0项目
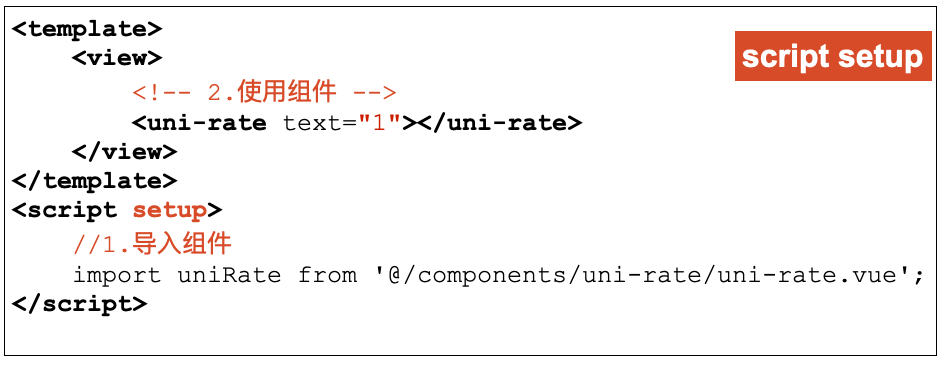
vue3.x项目
增加了script setup特性, 不用注册了
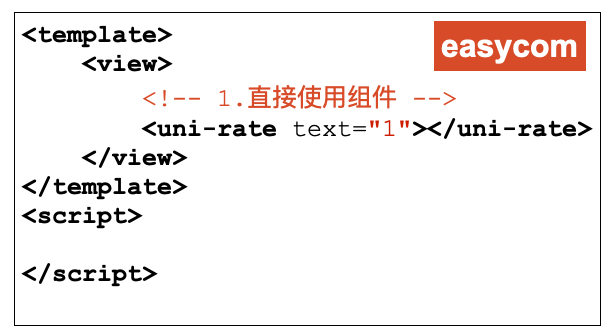
uni-app easycom方式
easycom方式直接引用
引用js
js文件
在js文件或者标签**
欢迎在评论区中进行批评指正,转载请注明来源,如涉及侵权,请联系作者删除。

