PyTorch Tutorials
Introduction to PyTorch
Tensors
Tensor和数组以及矩阵差不多, 区别是可以在GPU上运行, Tensor 和 numpy 数组可以共享内存, Tensor也可以在自动微分中优化, Tensor有很多操作和属性, 详见Tensor
初始化Tensor
Tensor可以以各种方法初始化:
list=>Tensor
data = [[1,2], [3,4]]
x_data = torch.tensor(data)
NumPy array=>Tensor
np_array = np.array(data)
x_np = torch.from_numpy(np_array)
Tensor=>Tensor
x_ones = torch.ones_like(x_data) # retains the properties of x_data
print(f"Ones Tensor: \n {x_ones} \n")

x_rand = torch.rand_like(x_data, dtype=torch.float) # overrides the datatype of x_data
print(f"Random Tensor: \n {x_rand} \n")
输出
Ones Tensor:
 tensor([[1, 1],
        [1, 1]])

Random Tensor:
 tensor([[0.4557, 0.7406],
        [0.5935, 0.1859]])
创建tuple大小的Tensor
shape = (2,3,)
rand_tensor = torch.rand(shape)
ones_tensor = torch.ones(shape)
zeros_tensor = torch.zeros(shape)
Tensor的属性
tensor = torch.rand(3,4)

print(f"Shape of tensor: {tensor.shape}") #Shape of tensor: torch.Size([3, 4])
print(f"Datatype of tensor: {tensor.dtype}") #Datatype of tensor: torch.float32
print(f"Device tensor is stored on: {tensor.device}") #Device tensor is stored on: cpu
Tensor的操作
将Tensor放到GPU上
Tensor默认在CPU上创建, 可以检测GPU是否可用然后用tensor.to(device)放到GPU上:
# We move our tensor to the GPU if available
if torch.cuda.is_available():
    tensor = tensor.to('cuda')
标准的numpy切片操作
tensor = torch.ones(4, 4)
print('First row: ', tensor[0])
print('First column: ', tensor[:, 0])
print('Last column:', tensor[..., -1])
连接操作
tensor = Tensor.cat([tensor, tensor, tensor], dim=1)
矩阵相乘
#矩阵乘法
y1 = tensor @ tensor.T
y2 = tensor.matmul(tensor.T)

y3 = torch.rand_like(tensor)
torch.matmul(tensor, tensor.T, out=y3)

#逐元素相乘
z1 = tensor * tensor
z2 = tensor.mul(tensor)

z3 = torch.rand_like(tensor)
torch.mul(tensor, tensor, out=z3)
0维Tensor转Python基本类型
agg = tensor.sum()
agg_item = agg.item()
print(agg_item, type(agg_item)) #12.0 <class 'float'>
In-place operations
改变原来变量的操作叫做In-place operaions, pytorch 中方法后面加_的就是此类操作,比如
tensor.add_(5)#在原来的tensor上加5
tensor.copy_(y)
tensor.t_()
和Numpy转化
Tensor转Numpy
t = torch.ones(5)
print(f"t: {t}")
n = t.numpy()
print(f"n: {n}")
Numpy转Tensor
n = np.ones(5)
t = torch.from_numpy(n)
Datasets & Dataloader
介绍
Pytorch提供torch.utils.data.Dataset和torch.utils.data.Dataloader进行数据的预处理, Dataset存储样本和对应的标签, DataLoader给Dataset包装一层迭代器便于访问数据.
加载Dataset
Pytorch在Torchvision模块中包含了一些常见的数据集, 有如下:
- Caltech
- CelebA
- CIFAR
- Cityscapes
- COCO
- EMNIST
- FakeData
- Fashion-MNIST
- Flickr
- HMDB51
- ImageNet
- iNaturalist
- Kinetics-400
- KITTI
- KMNIST
- LFW
- LSUN
- MNIST
- Omniglot
- PhotoTour
- Places365
- QMNIST
- SBD
- SBU
- SEMEION
- STL10
- SVHN
- UCF101
- USPS
- VOC
- WIDERFace
- Base classes for custom datasets
加载数据集代码如下, 需要提供四个参数:
rootis the path where the train/test data is stored,trainspecifies training or test dataset,download=Truedownloads the data from the internet if it’s not available atroot.transformandtarget_transformspecify the feature and label transformations
training_data = torchvision.datasets.FashionMNIST(
    root="data",
    train=True,
    download=True,
    transform=transforms.ToTensor()
)
访问dataset
可以用[ ]来访问dataset, 比如MNIST数据集:
train_dataset = torchvision.datasets.MNIST(root='../../data',
                                           train=True,
                                           transform=transforms.ToTensor(),
                                           download=False)
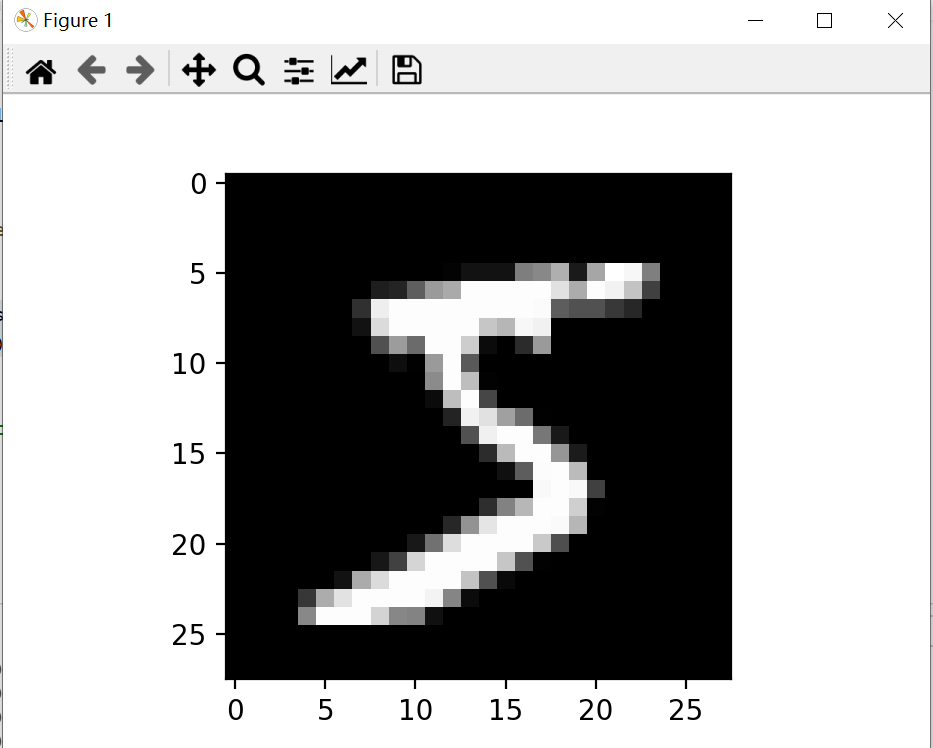
print(train_dataset[1]) #tuple (1*28*28的Tensor, lable对应的num)
img, lable = train_dataset[0]
plt.imshow(img.squeeze(), cmap="gray")
plt.show()
可视化如图所示:

实现自己的dataset
自定义的Dataset类必须实现三个函数: __init__, __len__, __getitem__
用Dataloaders准备训练数据
from torch.utils.data import DataLoader

train_dataloader = DataLoader(training_data, batch_size=64, shuffle=True)
test_dataloader = DataLoader(test_data, batch_size=64, shuffle=True)
Dataloader迭代访问数据
Dataloader的每个迭代会返回batch_size(默认为1)大小的数据, 比如
train_features, train_labels = next(iter(train_loader))
print(train_features.size())	#输出[100,1,28,28]
print(train_labels.size())		#输出[100]
PyTorch Docs-PyTorch
Python API
torch.nn
torch.nn包含以下模块:
- Containers
- Convolution Layers
- Pooling layers
- Padding Layers
- Non-linear Activations (weighted sum, nonlinearity)
- Non-linear Activations (other)
- Normalization Layers
- Recurrent Layers
- Transformer Layers
- Linear Layers
- Dropout Layers
- Sparse Layers
- Distance Functions
- Loss Functions
- Vision Layers
- Shuffle Layers
- DataParallel Layers (multi-GPU, distributed)
- Utilities
- Quantized Functions
- Lazy Modules Initialization
Convolution Layers 卷积层
nn.Conv2d
torch.nn.Conv2d(in_channels, out_channels, kernel_size, stride=1, padding=0, dilation=1, groups=1, bias=True, padding_mode=’zeros’, device=None, dtype=None)
- in_channels (int) – Number of channels in the input image
- out_channels (int) – Number of channels produced by the convolution
- kernel_size (int or tuple) – Size of the convolving kernel
- stride (int or tuple, optional) – Stride of the convolution. Default: 1
- padding (int, tuple or str, optional) – Padding added to all four sides of the input. Default: 0
- padding_mode (string, optional) –
'zeros','reflect','replicate'or'circular'. Default:'zeros' - dilation (int or tuple, optional) – Spacing between kernel elements. Default: 1
- groups (int, optional) – Number of blocked connections from input channels to output channels. Default: 1
- bias (bool, optional) – If
True, adds a learnable bias to the output. Default:True
形状
Input: $(N, C_{in}, H_{in}, W_{in})$ (N是batch大小)
Output:$(N, C_{out}, H_{out}, W_{out})$
$$
H_{out} = \lfloor{\frac{H_{in} + 2padding[0]+dialation[0](kernel[0]-1)-1}{strde[0]} + 1} \rfloor
$$
$$
W_{out} = \lfloor{\frac{W_{in} + 2padding[1]+dialation[1](kernel[1]-1)-1}{strde[1]} + 1} \rfloor
$$
Normalization Layers
nn.BatchNorm2d
torch.nn.BatchNorm2d(num_features, eps=1e-05, momentum=0.1, affine=True, track_running_stats=True, device=None, dtype=None)
参数
- num_features – $C$ from an expected input of size$(N,C,H,W)$
- eps – a value added to the denominator for numerical stability. Default: 1e-5
- momentum – the value used for the running_mean and running_var computation. Can be set to
Nonefor cumulative moving average (i.e. simple average). Default: 0.1 - affine – a boolean value that when set to
True, this module has learnable affine parameters. Default:True - track_running_stats – a boolean value that when set to
True, this module tracks the running mean and variance, and when set toFalse, this module does not track such statistics, and initializes statistics buffersrunning_meanandrunning_varasNone. When these buffers areNone, this module always uses batch statistics. in both training and eval modes. Default:True
形状
- Input: $(N,C,H,W)$
- Output:$(N,C,H,W)$(same shape as input)
问题解决
plt画图报错
报错内容显示”This application failed to start because it could not find or load the Qt platform plugin “windows” in
方法:
在代码前加入
from os import environ

def suppress_qt_warnings():
    environ["QT_DEVICE_PIXEL_RATIO"] = "0"
    environ["QT_AUTO_SCREEN_SCALE_FACTOR"] = "1"
    environ["QT_SCREEN_SCALE_FACTORS"] = "1"
    environ["QT_SCALE_FACTOR"] = "1"

suppress_qt_warnings()
在环境变量列表中新建变量
QT_PLUGIN_PATH设值为D:\Environment\Anaconda\Library\plugins.
欢迎在评论区中进行批评指正,转载请注明来源,如涉及侵权,请联系作者删除。

